Finally, we have come to the concluding part of the blog series. As of now, we have three main tasks remaining. First, showing the video player, second the option to click on a video to change it in video player and third is search capabilities to search for videos.
Add Video Player
To add a video player, go to App.js and make changes as shown below.
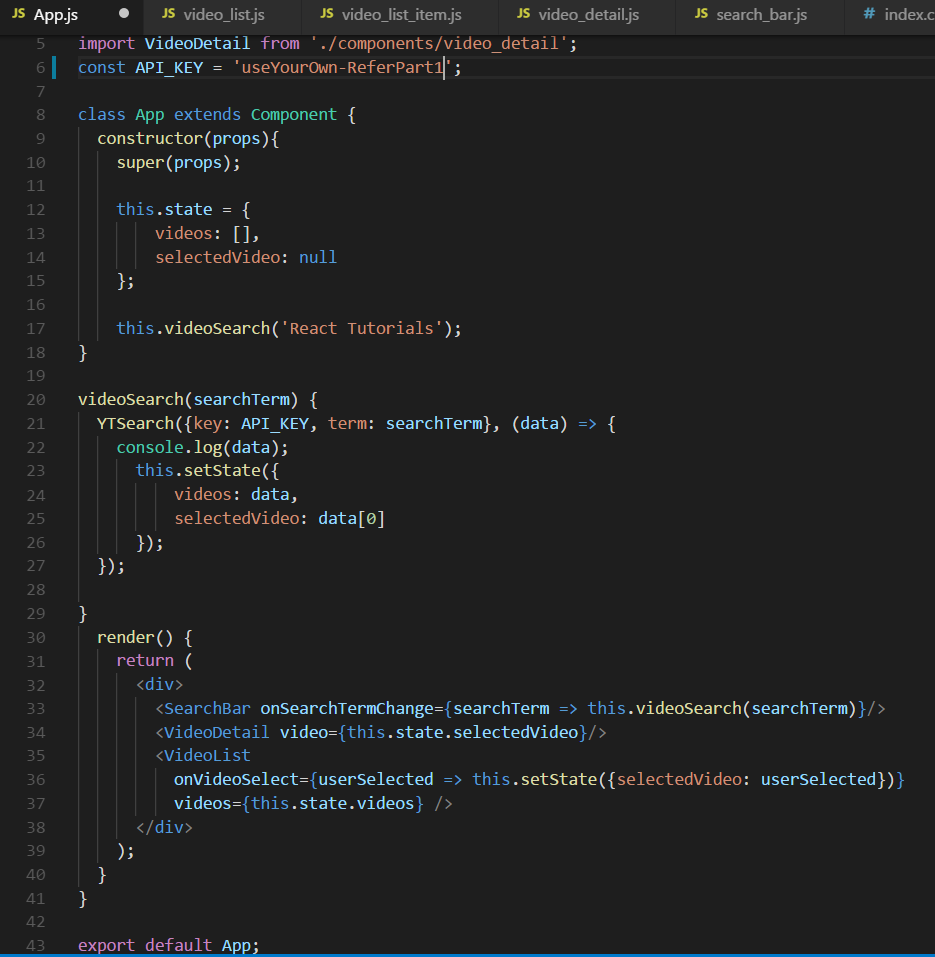
App.js changes
The code for video details are these two lines
import VideoDetail from ‘./components/video_detail’;
<VideoDetail video={this.state.selectedVideo}/>
Notice that we have created a new key-value pair selectedVideo in state, which will be used later to select video. It defaults to the first video when the search is done in YTSearch by selectedVideo: data[0] and this gets passed to VideoDetail as props.
Let’s update video_detail.js next and understand the logic.
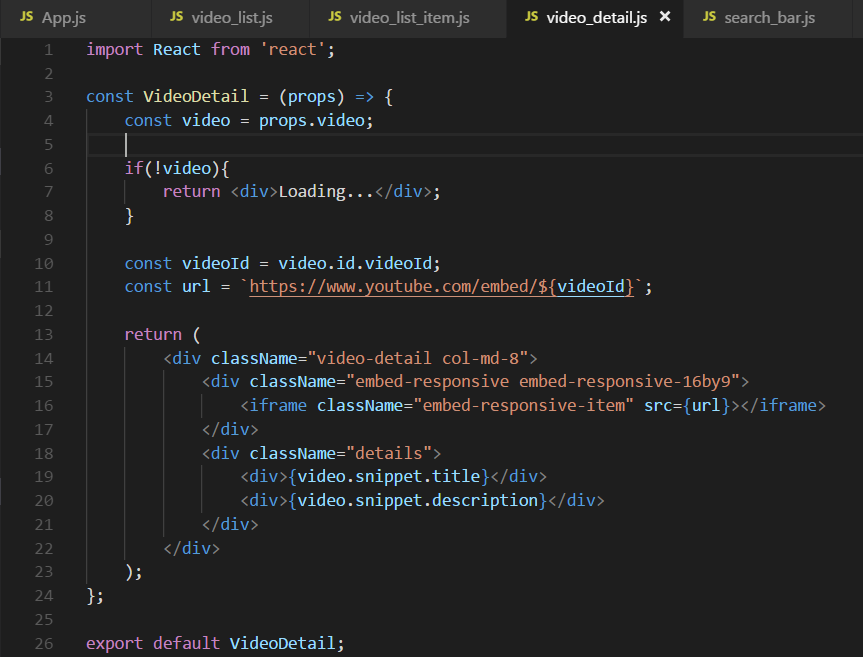
video_detail.js
In it, we are receiving the single video object as prop and extracting video Id, title and description from it. Later, it is displayed in an iframe and the title and description are shown below it. Also, bootstrap is used for styling.
Please take a look at the below statements, as they are very important.
if(!video){
return <div>Loading…</div>
}
Comment them out and you will get the below error
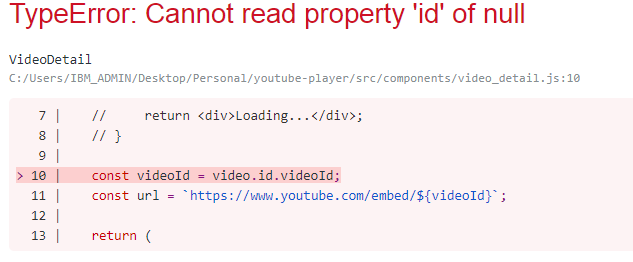
null error
This phenomenon occurs because in our App.js, we have selectedVideo and null initially set in state. Later, the YTSearch happens, which goes to YouTube for search and takes around one to two seconds. Later, selectedVideo: data[0] is changed.
But, React doesn’t wait for it and render() runs, and passes the selectedVideo as null to VideoDetail.
To avoid this situation, we check for no video, then show loading...
Click to Change Video
To do this, we have added onVideoSelect in VideoList in App.js
<VideoList
onVideoSelect={userSelected => this.setState({selectedVideo: userSelected})}
videos={this.state.videos}
/>
This is a special way to prop from parent to children and then back to them. This is known as callback. It can be used to pass props to more than one level deep and receive data back.
Now, let’s move to video_list.js and receive these props.
const videoItems = props.videos.map((video) => {
return (
<VideoListItem
onUserSelected={props.onVideoSelect}
key={video.etag}
video={video} />
);
});
We are not doing anything here and passing the props to its child VideoListItem. So, let’s move to video_list_item.js and update it.
<li onClick={() => onUserSelected(video)}
className=”list-group-item”>
<div classname="video-list" media=">
	<div classname="media-left">
		<img classname="media-object” src="{imageUrl}">
	</div>
	<div classname="media-body">
		<div classname="media-heading">{video.snippet.title}</div>
	</div>
</div>
</li>
We have added an onClick event handler on li element. So, when the user clicks on it, it passes the video to onUserSelected.
The onUserSelected in video_list.js, passed it back to onVideoSelect in App.js
In App.js it is used to update the new video to selectedVideo by onVideoSelect={userSelected => this.setState({selectedVideo: userSelected})}
This runs the render() again and the new video is passed to VideoDetail component and gets displayed.
Search Capabilities
To do this, we added onSearchTermChange in SearchBar in App.js
<SearchBar onSearchTermChange={searchTerm => this.videoSearch(searchTerm)}/>
We are again using callback. So, let’s move to search_bar.js . Here, we will add this to onInputChange() method.
onInputChange(event) {
this.setState({ term: event.target.value });
this.props.onSearchTermChange(event.target.value);
}
So, we are passing the event.target.value, which is nothing but the updated text in the input box.
Back in App.js, we are using this new text value to run the videoSearch() function again.
Minor Style Changes
Go to index.css and change it completely.
These are minor styles to make our app look better. All of them are self-explanatory.

index.css
The index.css file is called from our index.js, which we never changed. So, the styles will be reflected. Only a minor thing needs to be added in search_bar.js
Add className="search-bar" to the top level div as shown below.
<div className=”search-bar”>
	<input value={this.state.term} onChange={this.onInputChange} />
</div>
This completes this tutorial and we get this amazing YouTube search app.
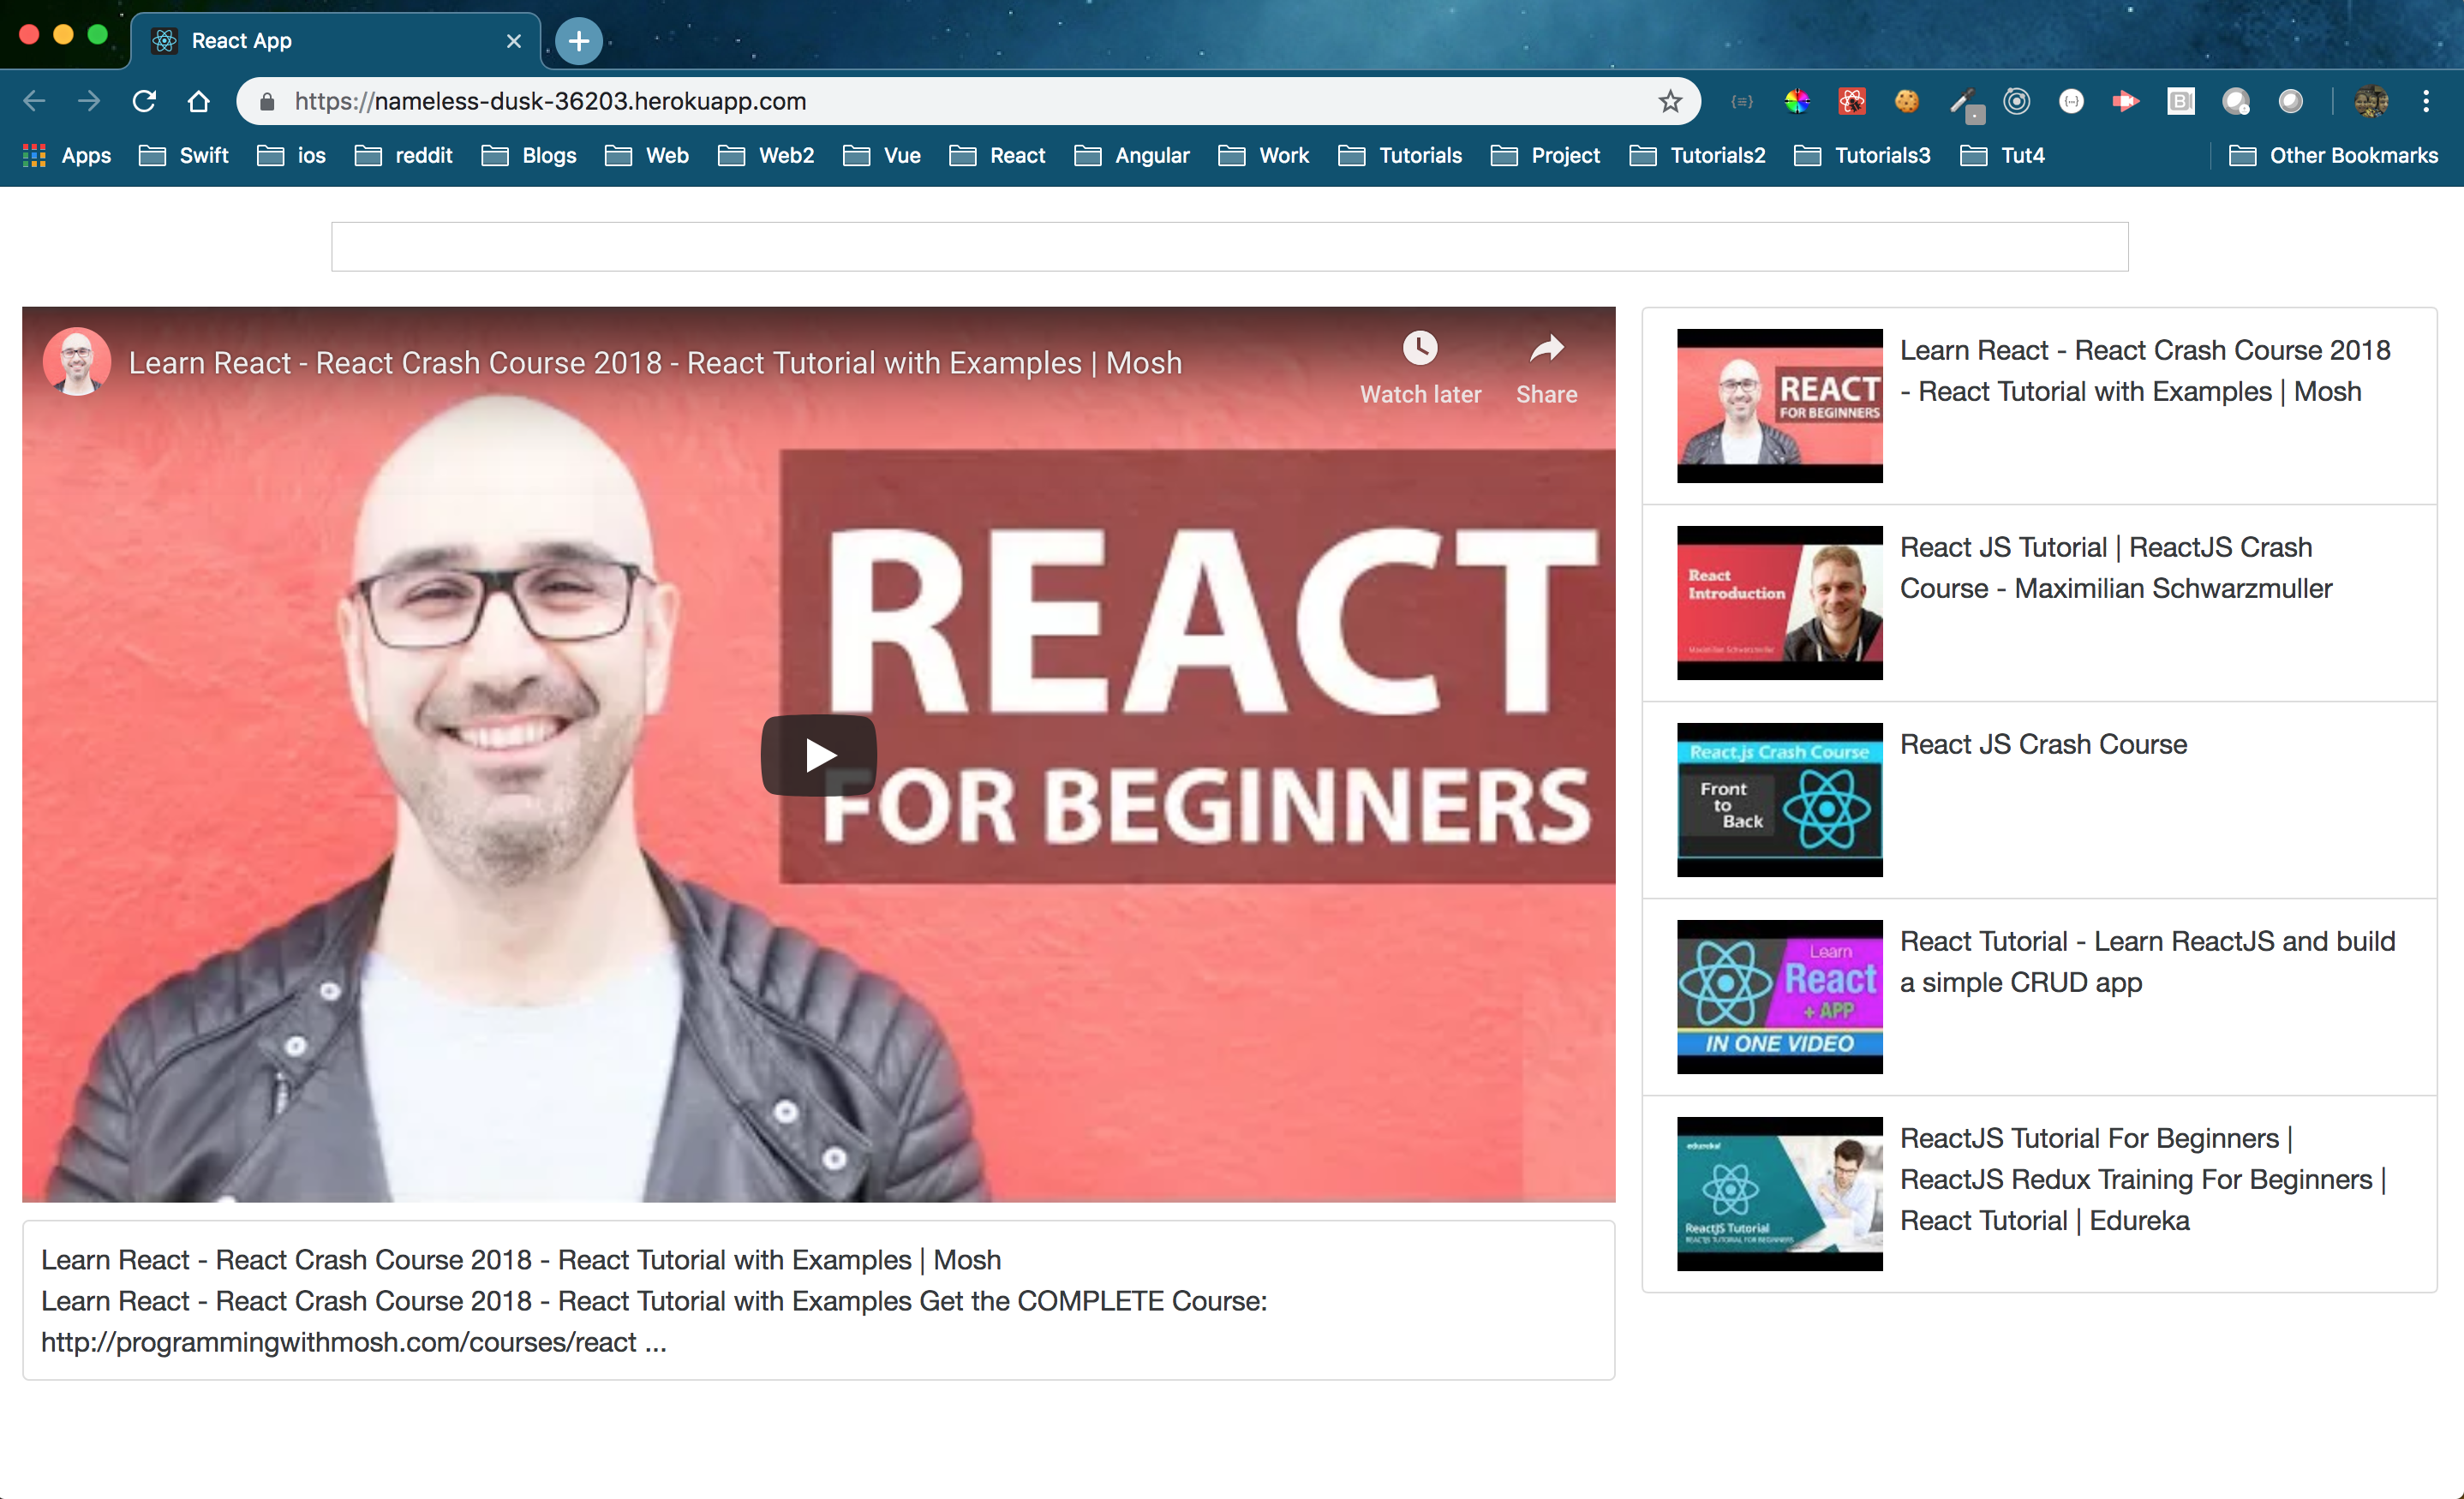
Deployment in Heroku
The project is deployed in Heroku. You can find it here.
You can find the complete code in this github repo.
Read More: Create YouTube Player in ReactJs — Part 1
Read More: Create YouTube Player in ReactJs — Part 2
About Innominds
Innominds is a leading Digital Transformation and Product Engineering company headquartered in San Jose, CA. It offers co-creation services to enterprises for building solutions utilizing digital technologies focused on Devices, Apps, and Analytics. Innominds builds better outcomes securely for its clients through reliable advanced technologies like IoT, Blockchain, Big Data, Artificial Intelligence, DevOps and Enterprise Mobility among others. From idea to commercialization, we strive to build convergent solutions that help our clients grow their business and realize their market vision.
To know more about our offerings, please write to marketing@innominds.com