Introduction
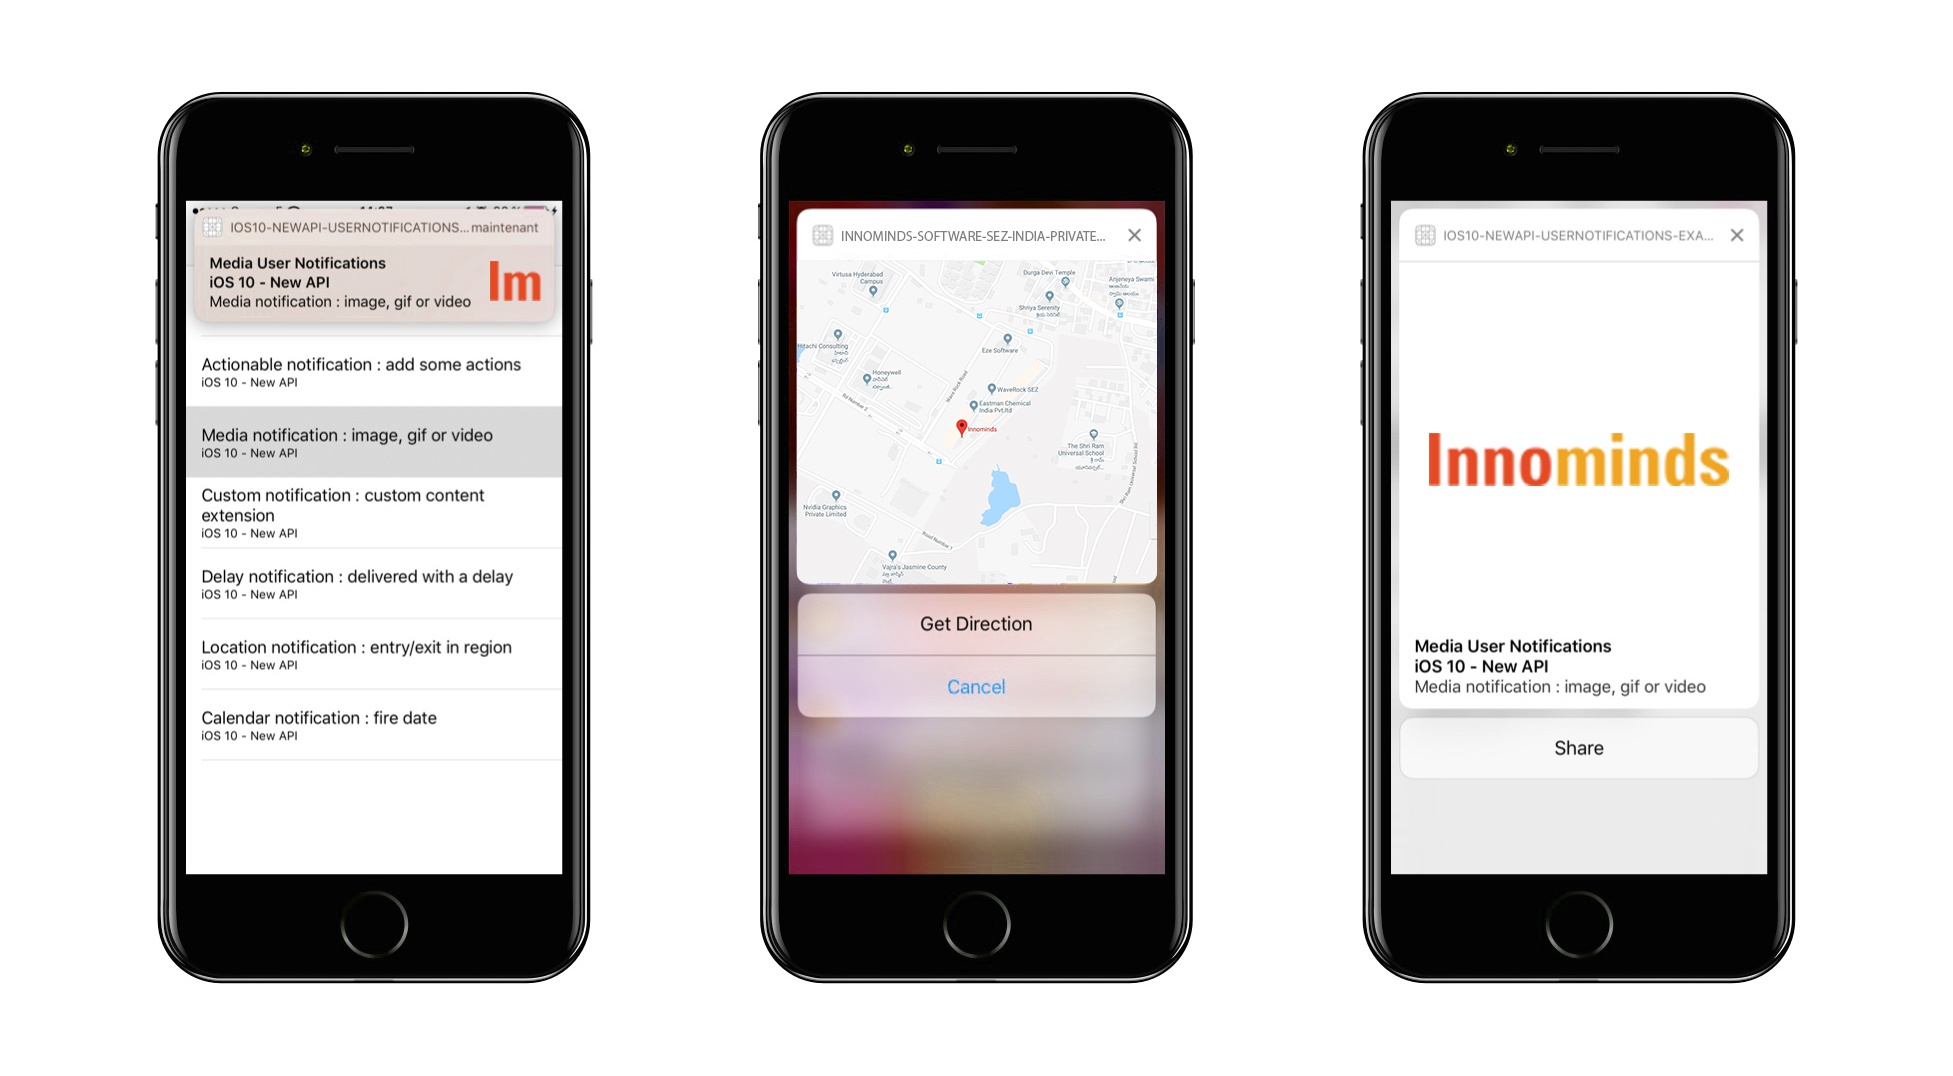
Notifications have become trendier with the new visual refresh in iOS 10. As part of a new framework, Apple has introduced new features that help us make notifications that contain images, sound and video.
The application enables us to provide an option for an instant reply for the notification without opening it.
All mobile marketers are using rich notifications to make user interactions on notifications simple and flexible. Today, 95% of push notifications comprise of media. This has led to 18% increase in the number of apps opened per month that are attributed to notifications.
Supported Media
Each platform supports different types of media.
iOS
- Image (JPEG, GIF, PNG) — Audio (AIFF, WAV, MP3, M4A)
- Video (MPEG, MPEG2, MP4, AVI)
Android
- Image (JPEG, PNG)
Size Limit
The theoretical maximum file sizes are 5MB for the image, 10MB for audio and 50MB for video.
Analytics
We can add analytics to measure user behavior on rich notifications and apps usage.
Example:
- Does the user open the rich notification?
- How frequently is the user opening the app by sending rich notifications?
- Are they interacting with the notifications like an Instant reply?
Mobile marketers can improve their business logic and strategy based on these analytics.
Using Rich Notifications
Pre-requirements
- Xcode 8.0+
- Minimum iOS 10
- OS X 10.11
- UserNotifications.framework
Rich Notification payload is like normal APNS payload, but with some extra parameters in the payload.
Sample Payload Format
{
  "aps": {
    "alert": {
          "body": "Push notification body",
          "title": "Push notification title"
      },
      "mutable-content": 1,
      "category": "Category Name"
    },
     "attachment": "url to be displayed"
}
Note: This payload format will change depending upon the requirements
Significance
|
Parameter |
Significance |
|---|---|
|
content-available |
Property that signifies that there are some extra keys to be taken into consideration, content-available: 1 |
|
mutable-content |
This signifies that the OS should initiate the service extension of the app to perform some extra processing |
|
category |
This name must be equal with the category name in notification content extension info.plist |
|
attachment |
It gives the download link for the Image/Video/Gif to be attached |
Bundle ID
If you are familiar with group IDs, you can use them. Or else, use 3 different bundle IDs.
Sample:
com.companyname.appname
com.companyname.appname.NotificationContent
com.companyname.appname.NotificationExtension
Create provisional profiles for the bundle IDs and enable push notifications.
Sample APP
Step 1: Initial Setup
- Create a sample project with the single view app
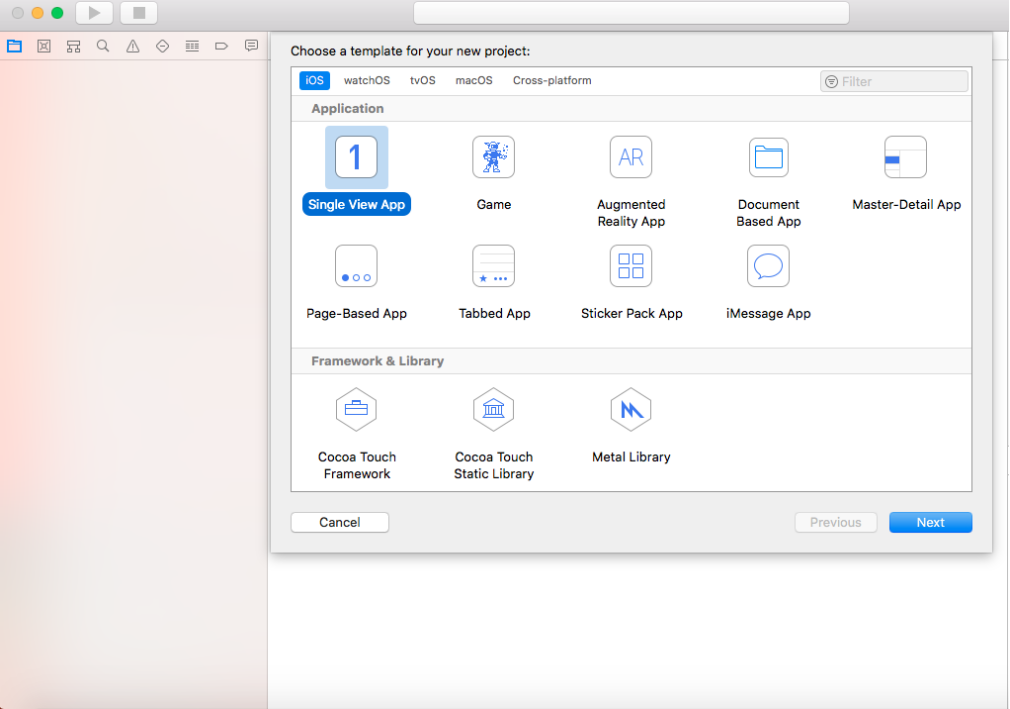
- Change the deployment target to iOS 10.0
- Enable push notifications in Project -> Targets -> Capabilities
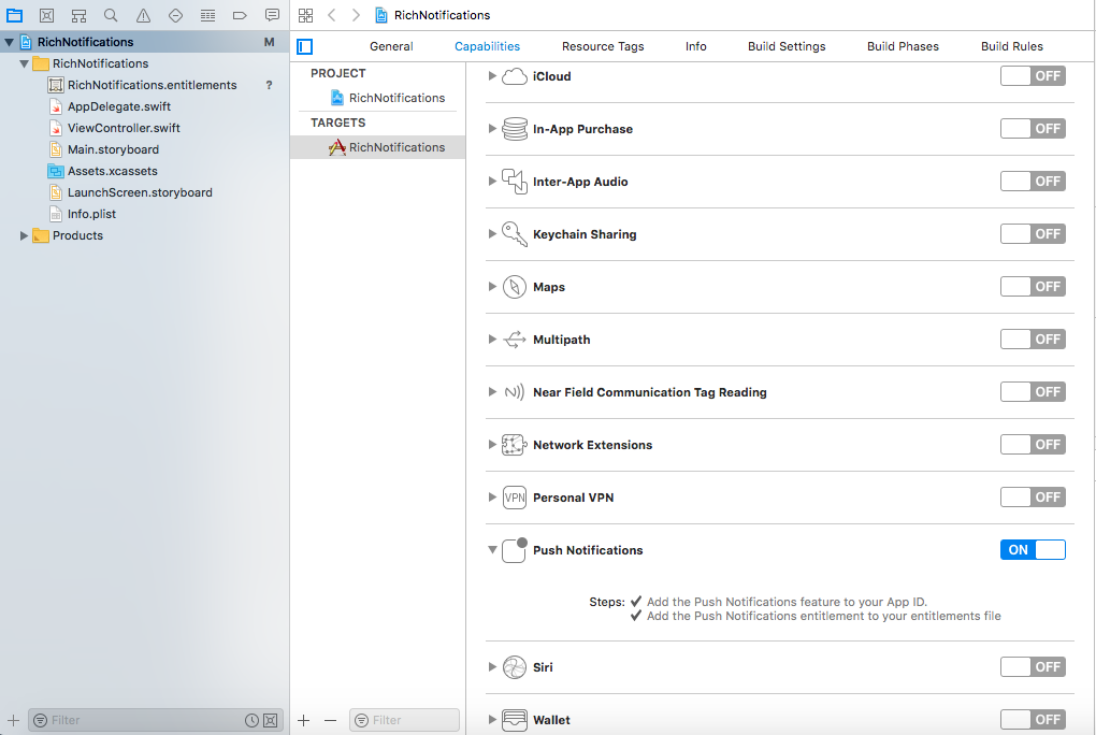
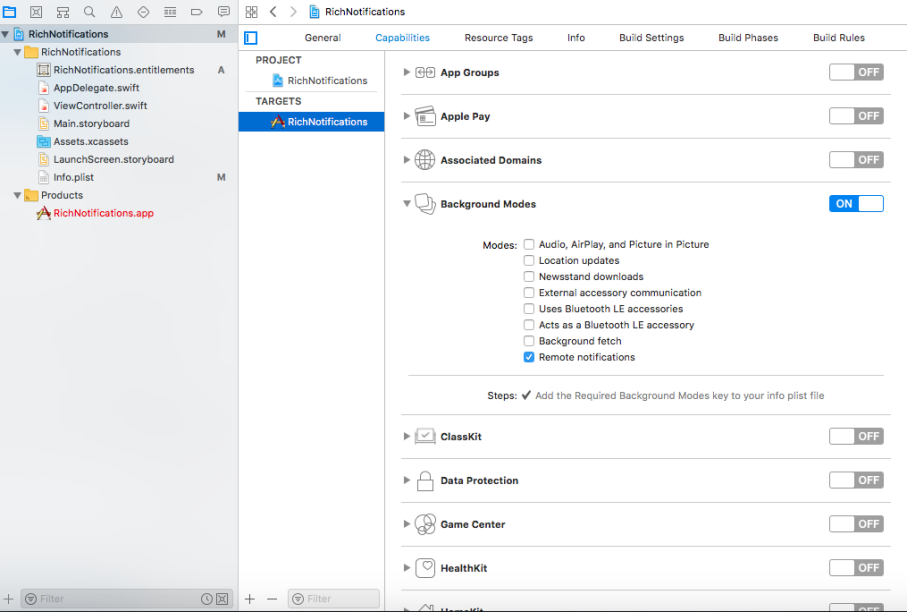
- Enable background mode with remote notifications in Project -> Targets -> Capabilities
- Import UserNotifications.framework and UserNotificationsUI.framework
Coding
Step 2: Getting Device Token
- Import UserNotifications in AppDelegate then add UNUserNotificationCenterDelegate protocol
- Call register for notifications for APNS token
func application(_ application: UIApplication, didFinishLaunchingWithOptions launchOptions: [UIApplicationLaunchOptionsKey: Any]?) -> Bool  {
        // Override point for customization after application launch.
        UNUserNotificationCenter.current().delegate = self
        if #available(iOS 10, *) {
          UNUserNotificationCenter.current().requestAuthorization(options:[.badge, .alert, .sound]){ granted, error in }
        } else { // iOS 9 support
          application.registerUserNotificationSettings(UIUserNotificationSettings(types: [.badge, .sound, .alert], categories: nil))
        }
        application.registerForRemoteNotifications()
        return true
      }
Get the device token in delegate methods.
func application(_ application: UIApplication, didRegisterForRemoteNotificationsWithDeviceToken deviceToken: Data) {
    let deviceTokenString = deviceToken.reduce("") { $0 + String(format: "%02X", $1) }
    print("APNs device token: \(deviceTokenString)")
    // Persist it in your backend in case it's new
  }

  func application(_ application: UIApplication,
    didFailToRegisterForRemoteNotificationsWithError error: Error) {
    print("APNs registration failed: \(error)")

  }
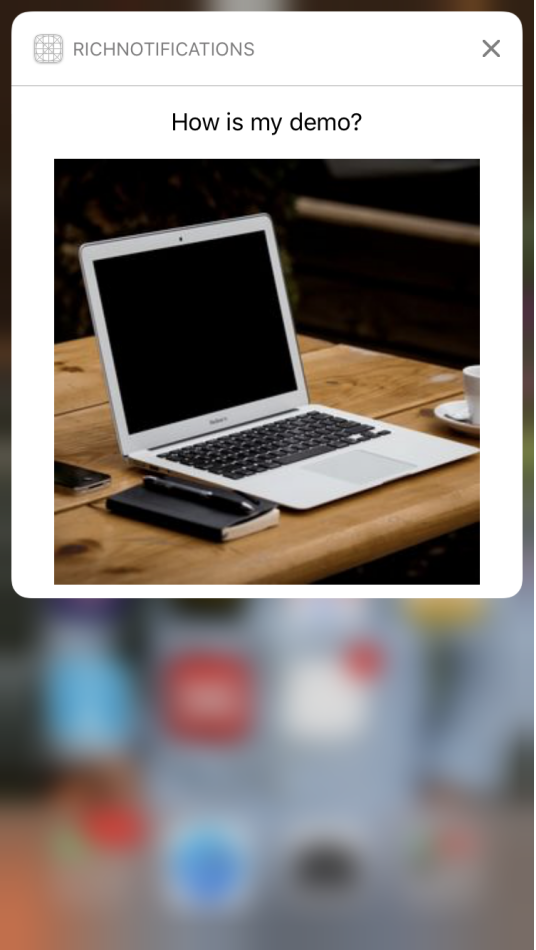
Example Payload
{
   "aps":{
      "alert":"How is my demo?",
      "sound":"default",
      "mutable-content":1,
      "badge":1,
      "category":"Feedback"
   },
   "attachment-url":"https://picsum.photos/300/300?image=0"
}
UNNotification Extensions
Apple added 2 more extensions from iOS 10 for notifications
- Notification Service Extension - For downloading and saving attachment file from URL
- Notification Content Extension - To display custom UI for notification
Step 3: Adding Notification Service Extension
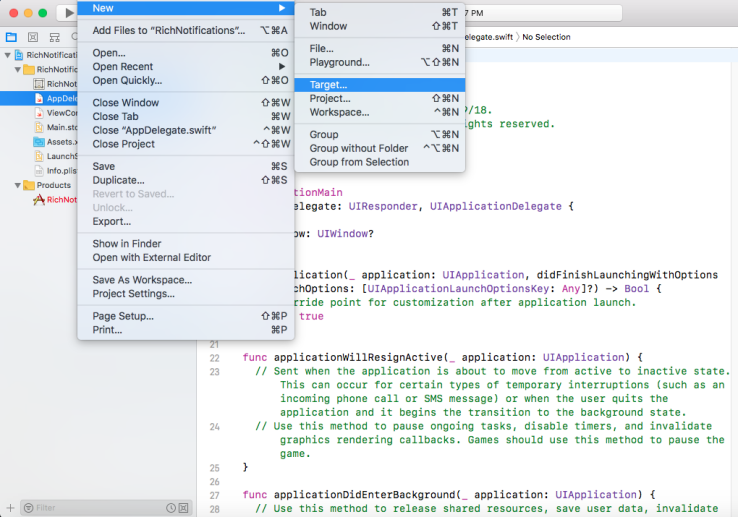
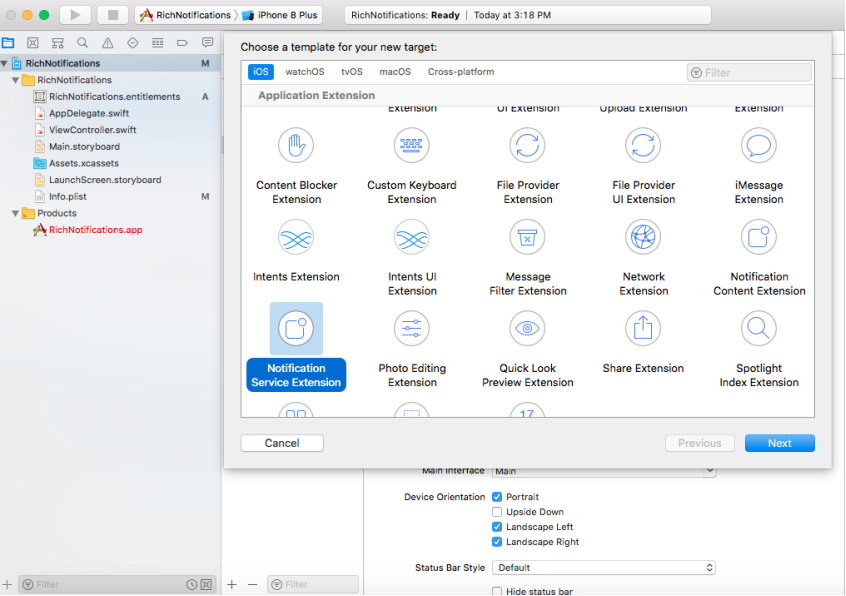
- Select Project Name -> File -> New -> Target -> Notification Service Extension
- Enter Product name then click on finish button. It will add Notification Service Extension to the project. (This extension contains NotificationService.swift and info.plist files)
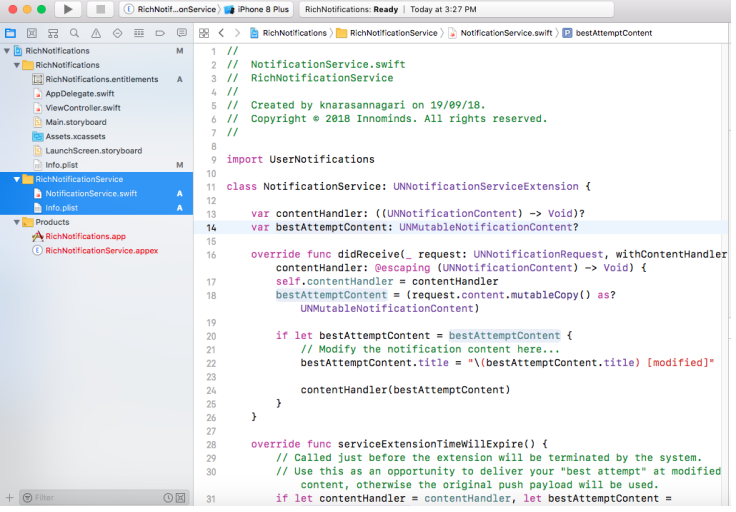
Change the deployment target to iOS 10.
- I modified the didReceive method as per my Payload. You can write your own Parsing here.
override func didReceive(_ request: UNNotificationRequest, withContentHandler contentHandler: @escaping (UNNotificationContent) -> Void) { self.contentHandler = contentHandler bestAttemptContent = (request.content.mutableCopy() as? UNMutableNotificationContent) // Modify the notification content here... if let bestAttemptContent = bestAttemptContent { //Get attachment URL from JSON Payload if let urlString = bestAttemptContent.userInfo["attachment-url"] as? String, let data = NSData(contentsOf: URL(string:urlString)!) as Data? { let path = NSTemporaryDirectory() + "attachment" _ = FileManager.default.createFile(atPath: path, contents: data, attributes: nil) //Save into temporary Storage do { let file = URL(fileURLWithPath: path) let attachment = try UNNotificationAttachment(identifier: "attachment", url: file,options:[UNNotificationAttachmentOptionsTypeHintKey : "public.jpeg"]) bestAttemptContent.attachments = [attachment] } catch { print(error) } } contentHandler(bestAttemptContent) } } - If an attachment fails to download or it takes too long to download an attachment service extension time will expire method will call. You can handle here accordingly.
Up to this point, you will display Rich notifications with default UI.
Note: Use different bundle ID and provisions for extensions.

Step 4: Adding Notification Content Extension
- Select Project Name -> File -> New -> Target -> Notification Content Extension
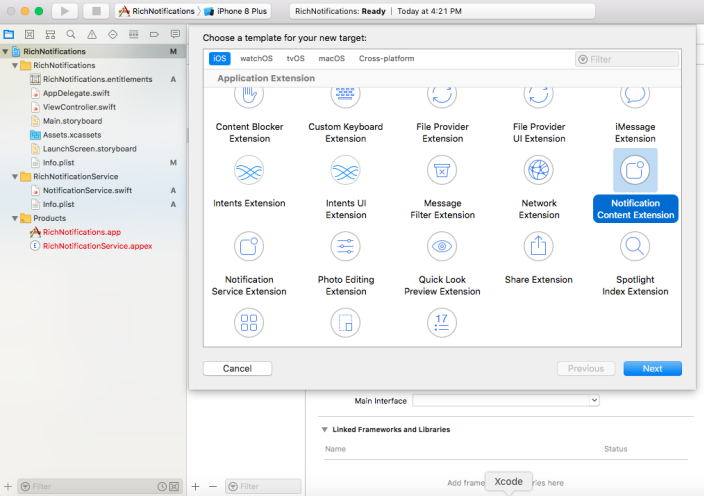
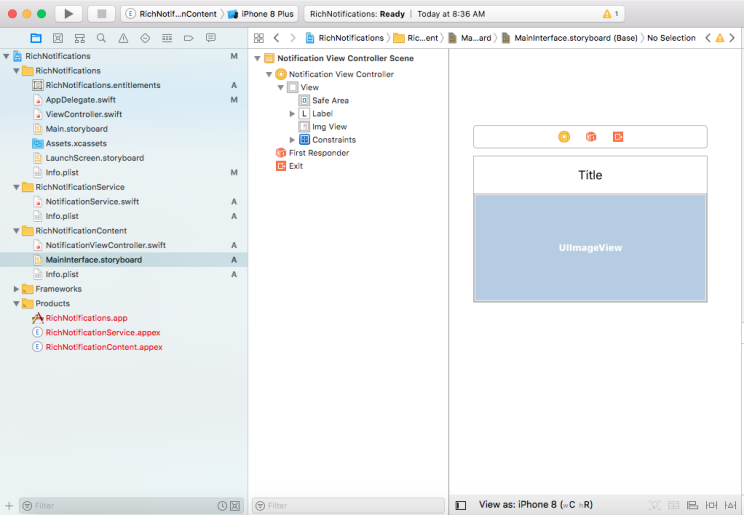
- Enter Product name then click on finish button. It will add Notification Content Extension to the project. (This extension contains ViewController.swift, Story Board and info.plist files)

- You can create your own custom UI in the storyboard. I modified mine as per my requirement. (i.e Image view and text)
- Write your own logic to display image.
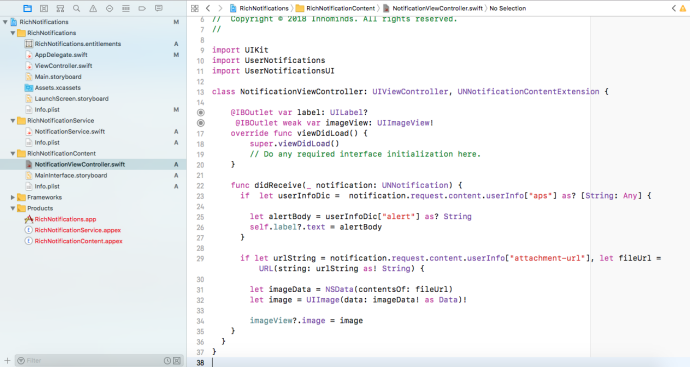
func didReceive(_ notification: UNNotification) { if let userInfoDic = notification.request.content.userInfo["aps"] as? [String: Any] { let alertBody = userInfoDic["alert"] as? String self.label?.text = alertBody } if let urlString = notification.request.content.userInfo["attachment-url"], let fileUrl = URL(string: urlString as! String) { let imageData = NSData(contentsOf: fileUrl) let image = UIImage(data: imageData! as Data)! imageView?.image = image } } - It will display the notification with our own custom UI. If you want to hide default view set UNNotificationExtensionDefaultContentHidden to YES in info.plist.
How to Add Actions to Notification
You can add instant actions to notification itself.
- You can add the following method in Notification service or Notification content or App Delegate.
func addActions() {
    let likeAction = UNNotificationAction.init(identifier: "like", title: "Like", options: [])
    let dislikeAction = UNNotificationAction.init(identifier: "dislike", title: "Dislike", options: [])
    let feedbackCategory = UNNotificationCategory.init(identifier: "Feedback", actions: [likeAction,dislikeAction], intentIdentifiers: [], options: [])
    UNUserNotificationCenter.current().setNotificationCategories([feedbackCategory])
  }
I added below code in Notification service and I called this method in
func didReceive(_ request: UNNotificationRequest, withContentHandler contentHandler: @escaping (UNNotificationContent) -> Void) method.Note: identifier name must be equal to the category name i.e Feedback as the identifier in this sample app
- Add delegate method for button actions in App delegate class.
func userNotificationCenter(_ center: UNUserNotificationCenter, didReceive response: UNNotificationResponse, withCompletionHandler completionHandler: @escaping () -> Void) {
    if (response.notification.request.content.categoryIdentifier == "Feedback") {
      if response.actionIdentifier == "like" {
        print("Thank you for Liking")
      }
      if response.actionIdentifier == "dislike" {
        print("Thanks! I will improve")
      }
    }
    completionHandler()
  }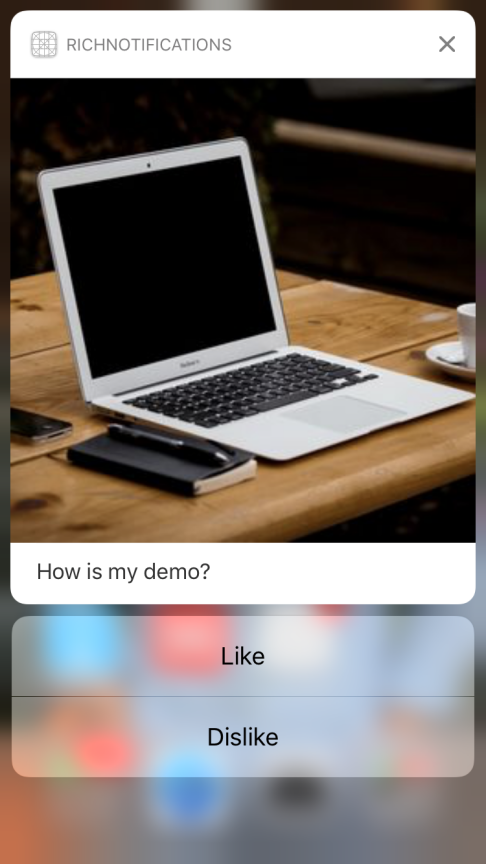
Points to Remember
- Set deployment target to iOS 10 for projects and extensions
- Use different bundle IDs
- Add App Transport security settings in Notification service extensions for HTTP URLs
- Category name must be same as category name in the payload
How to Debug Extensions?
Extension breakpoints can't work directly. So we need to attach the process to debug.
- Debug -> Attach to Process by PID or Name
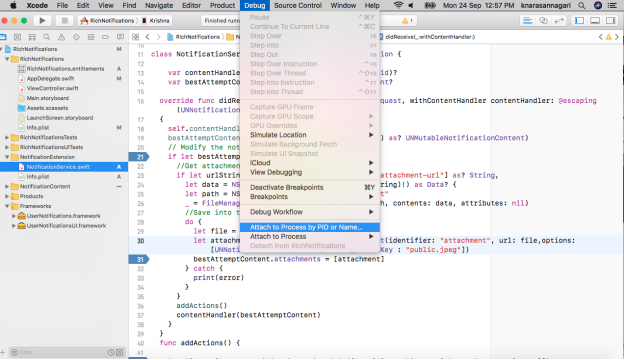
- Enter extension name and then click on attach
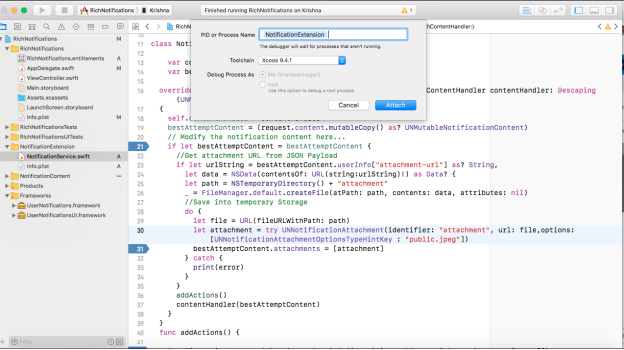
Now debugging and breakpoints will work on extensions.
Conclusion
Apple has provided its users with a state of the art feature that can provide notifications that have an engaging content to the end users. Irrespective of the type of application one is developing, a rich notification has more detail and easily grabs users attention with the content completely related to the context. And, this is the USP of the rich notification.