Introduction to Custom Renderers
Xamarin assists in delivering native Android, iOS and Windows apps with a single shared .NET codebase.

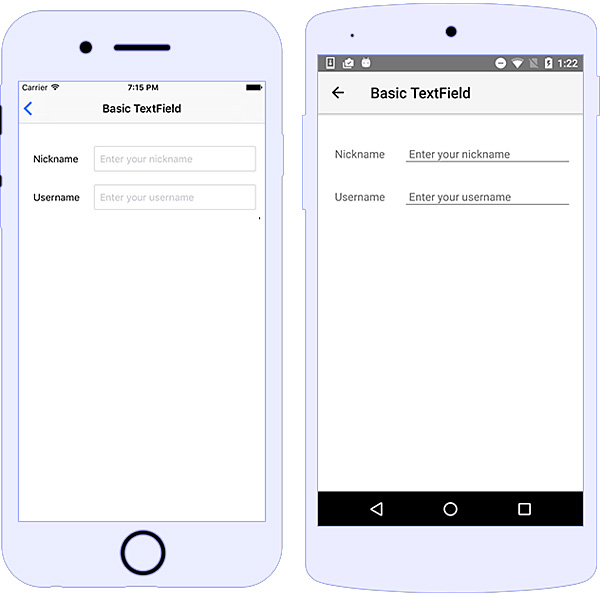
However, controls look different on different platforms. Example: TextBox as shown below
 Xamarin.Forms exposes a complete cross-platform UI Toolkit for .NET developers. This UI Toolkit renders UI controls as per native platform design.
When someone is developing cross platform applications, how does one handle situations where the controls must look uniform across platforms instead of taking after the native controls? In comes Custom Renderers.
What is the Use of Custom Renderers?
UI Toolkit renders the UI controls for respective platforms, but if we still need more customization for appearance and behavior of control, we need to implement Custom Renderers for the desired platform or for each platform.
For instance, a Textbox - UITextField in iOS and EditText in Android. In Xamarin, forms TextBox is an Entry. If we place the Entry in Xamarin forms shared project, UI Toolkit will render Entry for respective platforms with their native controls as mentioned above with default properties.
For iOS, a textbox will look like a box, and for Android it will look like a line, on top of which user can enter the text.
How do we Implement Custom Renderers?
The below sequence of steps will explain the process to create a Custom Renderer.
Create a class, which extends the Xamarin Control in Shared Project.
Creating this class in shared project is optional, however if you do not create this class in the shared project, all further controls (Text Boxes in our example) will be overridden by the Custom Renderer.
Create the class with name CustomRendererDemo as shown below:
using System;
using Xamarin.Forms;
namespace CustomRendererDemo
{
   public class CustomEntry:Entry
   {
		public CustomEntry(){
		}
   }
}
Create a new class called CustomEntryRenderer in the platform specific project by extending the Xamarin Renderer Class - EntryRenderer of Xamarin Control. This class shall contain the first line, which is an attribute for export from Shared Project class for iOS and Android platforms separately. See below code snippets for more details.
For Android:
using System;
using System.ComponentModel;
using Android.Content;
using CustomRendererDemo;
using CustomRendererDemo.Droid;
using Xamarin.Forms;
using Xamarin.Forms.Platform.Android;
[assembly: ExportRenderer(typeof(CustomEntry), typeof(CustomEntryRenderer))]
namespace CustomRendererDemo.Droid
{
  public class CustomEntryRenderer : EntryRenderer
    {
      public CustomEntryRenderer(Context context) : base(context{
      }
      protected override void OnElementChanged(ElementChangedEventArgs e)
      {
          base.OnElementChanged(e);
          if (e.OldElement == null)
          {
              Control.Background = null;
          }
          Control.TextSize = 16;
      }
  }
}
For iOS:
using System;
using System.ComponentModel;
using CustomRendererDemo.iOS;
using UIKit;
using Xamarin.Forms;
using Xamarin.Forms.Platform.iOS;
[assembly:ExportRenderer(typeof(CustomRendererDemo.CustomEntry),typeof(CustomEntryRenderer))]
namespace CustomRendererDemo.iOS
{
  public class CustomEntryRenderer: EntryRenderer
  {
    protected override void OnElementPropertyChanged(object sender, PropertyChangedEventArgs e)
    {
      base.OnElementPropertyChanged(sender, e);
      Control.Layer.BorderWidth = 0;
      Control.BorderStyle = UITextBorderStyle.None;
      Control.Font = UIFont.SystemFontOfSize(16);
    }
  }
}
Your new Custom Entry Custom Renderer is ready to use.
How do we Consume Custom Renderers?
After implementing Custom Renderer, import the name space into the required Xaml page as shown below.
xmlns:customRenderer="clr namespace:CustomRendererDemo;assembly=CustomRendererDemo"
For more details see below.
<?xml version="1.0" encoding="utf-8"?>
 	<ContentPage xmlns="http://xamarin.com/schemas/2014/forms"
                xmlns:x="http://schemas.microsoft.com/winfx/2009/xaml"
                xmlns:local="clr-namespace:CustomRendererDemo"
                xmlns:customRenderer="clr-namespace:CustomRendererDemo;assembly=CustomRendererDemo"
                x:Class="CustomRendererDemo.CustomRendererDemoPage">
       <StackLayout Orientation="Vertical">
       <StackLayout Padding="0" Margin="30,50" Orientation="Vertical">
           <customRenderer:CustomEntry />
           <BoxView HorizontalOptions="FillAndExpand" HeightRequest="1" VerticalOptions="StartAndExpand" Color="#
       </StackLayout>
           <Entry Margin="30" HorizontalOptions="FillAndExpand" VerticalOptions="CenterAndExpand"/>
       </StackLayout>
    </ContentPage>