Apple has introduced a fast and easy way to sign-in to your applications or websites with its ID. Instead of filling out lengthy forms, verifying email addresses and choosing/remembering new passwords, one can use 'Sign-in with Apple' to set up an account and start using its application. One can implement this functionality in all variants of the application running on native, web and other platforms.
Advantages
Security
For security purpose, all accounts are protected with two-factor authentication. On Apple devices, users are persistently signed in and can re-authenticate anytime with Face or Touch ID.
Privacy
Apple will not track any user’s activity from the applications or websites. Data obtained from the Apple account is limited to the user's name and verified email address. Apple’s private email relay lets users receive email even if they prefer to keep their address private.
Support
'Sign-In with Apple' works natively on iOS, macOS, tvOS and watchOS. It works on any browser, which means it can be deployed on any website and for versions of application running on other platforms.
Do's and Don'ts of Implementation
Human Interface Guidelines
Apple provided guidelines for 'Sign-in with Apple' button along with API to render in your applications and websites. When you use the system-provided APIs to create a sign-in with Apple button, you get:
- A button that's guaranteed to use an Apple-approved title, font, color and style
- Assurance that the button's content maintains ideal proportions as you change its style
- Automatic translation of the button's title into the language that's set for the device
- Support for configuring button's corner radius to match the style of your UI (iOS, macOS and web)
- A system provided alternative text label that let’s Voiceover describe the button
There are two types of system provided button variants for iOS, macOS, tvOS, and web: 'Sign-in with Apple' and 'Continue with Apple'. Choose the right variant that fits best with the terminology of your Sign-in experience.


For watchOS, system provides one variant: iOS 'Sign-in'.

Depending on the platform, the system provides up to three appearances for a Sign-in with Apple button: white, white with an outline, and black. Choose the appearance that works best with the background on which you display the button.


The button title may vary in length depending on the locale. Use the following values for guidance:
Minimum Width: 140px @1x
Minimum Height: 30px @1x
For more details, please visit Human Interface Guidelines
App Store Review Guidelines
Providing option of 'Sign-in with Apple' is required if the application uses third-party or social login services such as Facebook Login, Google Sign-in, Sign-in with Twitter, Sign-in with LinkedIn, Login with Amazon, or WeChat login to set up or authenticate the user's primary account.
Sign-in with Apple is not required if:
- Your app exclusively uses your company’s own account setup and sign-in systems
- Your app is an education, enterprise, or business app that requires the user to sign-in with an existing education or enterprise account
- Your app uses a government or industry-backed citizen identification system or electronic ID to authenticate users
- Your app is a client for a specific third-party service and users are required to sign into their email, social media, or other third-party accounts directly to access their content
For more details, please visit App Store Review Guidelines
Apple also provided Usage Guidelines for Websites and Other Platforms
Sample Application
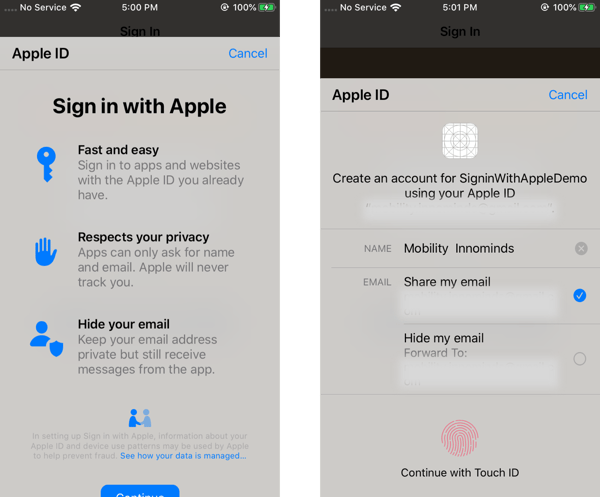
Before implementing 'Sign-in with Apple', one needs to enable the capability in their Developer Portal for the bundle ID. Once the user clicks on 'Sign-in with Apple' button to set up the account, it will prompt the user to give access to personal information after authenticating with Touch ID or Face ID on all Apple devices. Here, the user will have the option to select personal email and iCloud. Once authentication is complete, Apple gives you a unique, stable, team scope user identifier for an account and the user's name, verified email ID on request basis to maintain the session for your application.
Sample iOS Application
Prerequisites
- Xcode 11.0+
- iOS 13.0+
- macOS 10.15+
- tvOS 13.0+
- watchOS 6.0+
Using AuthenticationServices framework to let users set up accounts and Sign-in to your native iOS, macOS, tvOS, and watchOS apps.
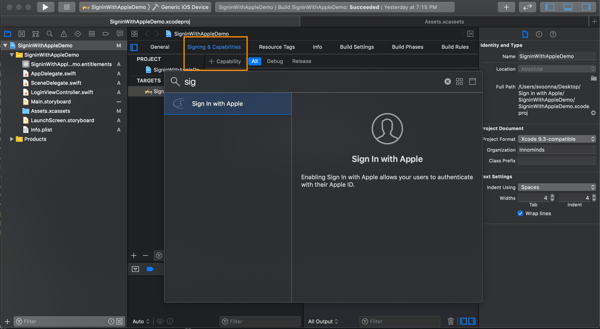
Create a project in Xcode 11 or later and add 'Sign-in with Apple' capability in signing & capabilities section.
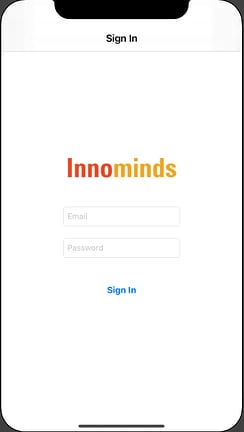
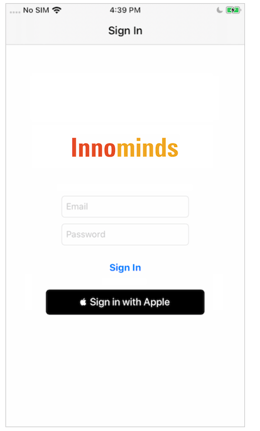
Design your login screen and a stack view placeholder for 'Sign-in with Apple' button. Below is the login screen.
As we are going to use AuthenticationServices framework, import AuthenticationServices framework in the login view controller and add the following piece of code to add 'Sign-in with Apple' button in login screen.
override func viewDidLoad() {
	super.viewDidLoad()
    addSignInWithAppleButton()
}
fileprivate func addSignInWithAppleButton() {
   // 1. Create ASAuthorizationAppleIDButton instance
     let authorizationButton = ASAuthorizationAppleIDButton()
   //2. Add target to handle the action.
      authorizationButton.addTarget(self, action: #selector(handleAuthorizationAppleIDButtonPress),    for:.touchUpInside)
   //3. Add authorizationButton to stack view for rendering in the login screen.
      loginProviderStackView.addArrangedSubview(authorizationButton)
}
@objc func handleAuthorizationAppleIDButtonPress() {

}
If you run the application, you will get the 'Sign-in with Apple' button with no action. Let's define the button action by implementing handleAuthorizationAppleIDButtonPress function.
@objc func handleAuthorizationAppleIDButtonPress() {
        // 1. Create an authorization request using the apple id provider.
        let request = ASAuthorizationAppleIDProvider().createRequest()
        // 2. Defining the request scope with an array of elements you need. You should only request if your application needs.
        request.requestedScopes = [.fullName, .email]
        // 3. Initialize the authorization controller with requests and set the delegate methods to handle user response.
        let authorizationController = ASAuthorizationController(authorizationRequests: [request])
        authorizationController.delegate = self
        authorizationController.presentationContextProvider = self

        // 4. Finally, perform the request.
        authorizationController.performRequests()
}
The presentation context provider has a data source method to identify a window to present the authorization controller.
func presentationAnchor (for controller: ASAuthorizationController) -> ASPresentationAnchor {
     return self.view.window!
}
Once the user selects 'Sign-in with Apple' button first time, Authorization Controller comes up with sign up flow. The user will be prompted to share personal information requested in the scope. If the user doesn't want to share the email ID, they can choose ‘hide my email’ option to move forward. In this case, we will get users random iCloud email ID for the communication. Going forward, it will prompt the user for authentication.
Once user authenticates with Touch ID/Face ID/Passcode, we will get notified with authorizationController (controller: ASAuthorizationController, didCompleteWithAuthorization authorization: ASAuthorization) delegate method to handle success flow. If user cancels the prompt or there are error cases, we will be notified by authorizationController (controller: ASAuthorizationController, didCompleteWithError error: Error) delegate method.
func authorizationController(controller: ASAuthorizationController, didCompleteWithAuthorization authorization: ASAuthorization) {
        if let credentials = authorization.credential as? ASAuthorizationAppleIDCredential {
            let name = credentials.fullName
            let email = credentials.email
            let userIdentifier = credentials.user

            // For Demo purpose we are showing the details.
            showDetails(name: name, email: email, userIdentifier: userIdentifier)

            // Save user identifier for further use
            saveUserIdentifier (identifier: userIdentifier)
        }
}

func authorizationController (controller: ASAuthorizationController, didCompleteWithError error: Error) {
        // Handle error
}
User identifier is the unique, stable and team scope ID to maintain application session. Here, we need to implement our session maintenance logic for the application.
For the existing applications, we can achieve this quick sign-in mechanism by simply adding Authorization Password Provider request. It will give you the application's saved credentials to move forward with existing application flow.
override func viewDidAppear(_ animated: Bool) {
        super.viewDidAppear(animated)
        performingExistingApplicationFlow()
    }

    func performingExistingApplicationFlow()  {
        let requests = [ASAuthorizationAppleIDProvider().createRequest(),
                        ASAuthorizationPasswordProvider().createRequest()]
        let authorizationController = ASAuthorizationController(authorizationRequests: requests)
        authorizationController.delegate = self
        authorizationController.presentationContextProvider = self
        authorizationController.performRequests()
}
Update delegate methods to handle Authorization Password Request.
func authorizationController(controller: ASAuthorizationController,didCompleteWithAuthorization authorization: ASAuthorization) {
        if let credentials = authorization.credential as? ASAuthorizationAppleIDCredential {
            let name = credentials.fullName
            let email = credentials.email
            let userIdentifier = credentials.user

            // For Demo purpose we are showing the details.
            showDetails(name: name, email: email, userIdentifier: userIdentifier)

            // Save user identifier for further use
            saveUserIdentifier(identifier: userIdentifier)
        } else if let credentials = authorization.credential as? ASPasswordCredential {
            // For Demo purpose we are showing the details.
            showCredential(username: credentials.user, password: credentials.password)
        }
}
Using the user identifier, we can check user’s current state. There are three types of states - Authorized, Revoked and Not Found. Depending on the state, your application needs to react to the user session. Getting the credentials state is one of the quick response API that needs to be checked at the time of application launch. Usually, we will implement it in applicationDidFinishLaunchingWithOptions method in AppDelegate.
func application (_ application: UIApplication, didFinishLaunchingWithOptions launchOptions: [UIApplication.LaunchOptionsKey: Any]?) -> Bool {
        // Override point for customization after application launch.
        let userID = getUserID()
        let appleIDProvider = ASAuthorizationAppleIDProvider ()
        appleIDProvider.getCredentialState(forUserID: userID) { (state, error) in
            switch state {
            case.authorized:
                // The Apple ID credential is valid.
                break
            case.revoked:
                // The Apple ID credential is revoked.
                break
            case.notFound:
                // No credential was found, so show the Login screen UI.
                break
            default:
                break
            }
        }
        return true
}
Conclusion
The salient features of 'Sign-in with Apple' are as follows:
- It is fast, easy account setup and sign-in for the application
- Streamlined one tap account setup without any forms
- Get a verified email ID for customer communication
- No need to verify the email from our end by sending the links/text to emails
- Built-in security with no new passwords and two-factor authentication for every account
- Supports cross platform with JavaScript API
About Innominds
Innominds is a leading Digital Transformation and Product Engineering company headquartered in San Jose, CA. It offers co-creation services to enterprises for building solutions utilizing digital technologies focused on Devices, Apps, and Analytics. Innominds builds better outcomes securely for its clients through reliable advanced technologies like IoT, Blockchain, Big Data, Artificial Intelligence, DevOps and Enterprise Mobility among others. From idea to commercialization, we strive to build convergent solutions that help our clients grow their business and realize their market vision.
Interested! For any demos or POCs, please write to us at marketing@innominds.com and know more about our offerings.
Content Courtesy
- https://developer.apple.com/sign-in-with-apple/
- https://developer.apple.com/design/human-interface-guidelines/sign-in-with-apple/overview/
- https://forums.developer.apple.com/thread/123098
- https://developer.apple.com/sign-in-with-apple/get-started/
- https://developer.apple.com/documentation/uikit/app_and_environment/responding_to_the_launch_of_your_app