Xamarin is an open-source cross-platform for application development which reduces the individual development efforts for different platforms such as iOS, Android, and Universal Windows Platform (UWP).
Xamarin Forms framework has different controls such as Button, Entry, Label, ListView, etc. Each one of these controls has its own appearance and behaviour based on the platform it runs on, viz iOS, Android or UWP. For example, if we use the control Entry, it will be rendered in the native control (TextBox) for the respective platform, but the look and behaviour will be different for other platforms.
To achieve the same look and behaviour across the platforms, developers can customize the appearance of a control using one of the following two methods:
- Custom Renderer
- Effects
To select the correct option based on requirement let’s understand how and when to use Custom Renderer and Effects in detail.
A Custom Renderer is used to customize the control behaviour and has a total grip of the control, whereas Effects allow customization of native controls on each platform and are usually used for small styling changes. Hence, if you want to modify a property of the native control, which is basically a small style change such as changing the background colour, underlining a label, adding a shadow, spacing etc., Effects become our best choice instead of a Custom Renderer. In the next section, let’s explore how to use Effects to modify the appearance of a control in Xamarin.
How to Use Xamarin Effects?
Following are the steps to implement Effects
- Inherit a class from PlatformEffect.
- Override the OnAttached and OnDetached methods to customize it. We can write business logic under the OnAttached method and code clean-up under the OnDetached method.
- ResolutionGroupName helps overcome the naming collision, and it is unique for the entire project.
- ExportEffect attribute is used to register the effect with a unique Id. This attribute stores two parameters: type of effect and name of the effect.
Here, in this section, we are creating an effect to change the Entry background colour whenever it gets the focus. We will also create an effect for iOS, which will remove or add the border for the Entry along with the background color effect.
Implementation of Effects for Android
Let’s start with Android, create a class under Android Project and add the below code:
[assembly:ResolutionGroupName("IM")]
[assembly:ExportEffect(typeof(FocusEffect),nameof(FocusEffect))]
namespace CustomFontsDemo.Droid.Effects
{
    public class FocusEffect : PlatformEffect
   {
        Android.Graphics.Color bgColor;
        protected override void OnAttached()
       {
            try
           {
                bgColor = Android.Graphics.Color.Red;
                Control.SetBackgroundColor(bgColor);
           }
            catch (Exception ex)
           {
                Console.WriteLine(ex.Message);
           }
       }
        protected override void OnDetached()
       {
            // can write cleanup the code, if required
       }
 protected override void
OnElementPropertyChanged(System.ComponentModel.PropertyChangedEventArgs
args)
       {
            base.OnElementPropertyChanged(args);
            try
           {
                if (args.PropertyName == "IsFocused")
               {
                    if
(((Android.Graphics.Drawables.ColorDrawable)Control.Background).Color ==
bgColor)
                   {

Control.SetBackgroundColor(Android.Graphics.Color.White);
                   }
                    else
                   {
                        Control.SetBackgroundColor(bgColor);
                   }
               }
           }
            catch (Exception ex)
            {
                Console.WriteLine(ex.Message);
           }
       }
   }
}
Implementation of Effects for iOS
Open the iOS project, create a class and add the below code:
[assembly: ResolutionGroupName("IM")]
[assembly: ExportEffect(typeof(FocusEffect), nameof(FocusEffect))]
namespace CustomFontsDemo.iOS.Effects
{
    public class FocusEffect : PlatformEffect
   {
        UIColor bgColor;
        protected override void OnAttached()
       {
            try
           {
                var textfield = Control as UITextField;
                if (textfield != null)
               {
                    bgColor = UIColor.Red;
                    Control.BackgroundColor = bgColor;
                    textfield.BorderStyle =
UITextBorderStyle.RoundedRect;
               }
           }
            catch (Exception ex)
           {
                Console.WriteLine(ex.Message);
           }
       }
        protected override void OnDetached()
       {
             //Code clean-up
       }
        protected override void
OnElementPropertyChanged(PropertyChangedEventArgs args)
       {
            base.OnElementPropertyChanged(args);
            try
           {
                if (args.PropertyName == "IsFocused")
               {
                    var textfield = Control as UITextField;
                    if (textfield != null)
                   {
                        if (textfield.BackgroundColor == bgColor)
{
                            textfield.BorderStyle =
UITextBorderStyle.None;
                            textfield.BackgroundColor = UIColor.White;
                       }
                        else
                       {
                            textfield.BackgroundColor = bgColor;
                            textfield.BorderStyle =
UITextBorderStyle.RoundedRect;
                       }
                   }
               }
           }
            catch (Exception ex)
           {
                Console.WriteLine(ex.Message);
           }
       }
   }
}
Create a class under PCL/SCL project and add the following code:
namespace CustomFontsDemo.Effects
{
    public class FocusEffect:RoutingEffect
   {
        public FocusEffect():base($"IM.{nameof(FocusEffect)}") \
       {
       }
   }
}
How to Consume Effect?
We can consume an Effect from ContentPage. For this, we need to import the namespace where it is defined. After this, we will apply the effect for the particular control using an alias.
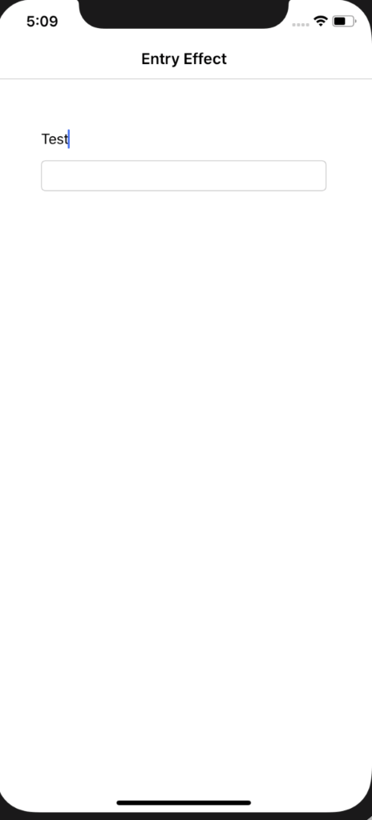
In the below code, we have created two Entries. The first one applies the Effect we have created, and the second one is a normal Entry to check the difference.
<?xml version="1.0" encoding="UTF-8"?>
<ContentPage xmlns="http://xamarin.com/schemas/2014/forms"
             xmlns:x="http://schemas.microsoft.com/winfx/2009/xaml"
             xmlns:effects="clr-namespace:CustomFontsDemo.Effects"
             x:Class="CustomFontsDemo.EffectsExamplePage">
    <ContentPage.Content>
        <StackLayout HorizontalOptions="FillAndExpand"
VerticalOptions="Center" Margin="50">
<Entry>
              <Entry.Effects>
                  <effects:FocusEffect />
              </Entry.Effects>
          </Entry>
          <Entry />
        </StackLayout>
    </ContentPage.Content>
</ContentPage>
.png?width=400&name=content%20(1).png)
.png?width=400&name=content%20(2).png)
.png?width=400&name=content%20(3).png)
Conclusion
For minimal visual changes/customizations Effects is the best option and recommended instead of custom renderer. Effects can be applied wherever required and not just for a single time/place.