In my previous blog we have learnt the basics of SAP UI5 and the steps for setting up the SAP UI5 project development environment. In this blog, we shall understand the basics of SAP HANA and and the steps for creating backend OData service.
SAP HANA
It is a data platform that we shall use to create simple DB tables and OData services.
Login to your SAP trial account. If you don't have it then create one.
Go to cockpit homepage.
For me it's: https://cockpit.hanatrial.ondemand.com/cockpit#/home/trial
Scroll down and you will see 'Access Neo Trial'.
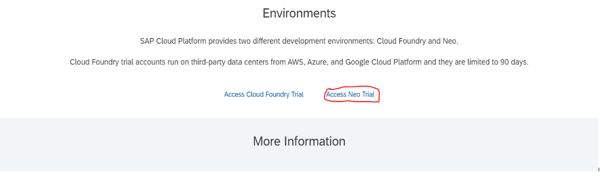
If this account is active, you will be taken to Neo cockpit home page else you will have to go through a simple signup process to reach there.
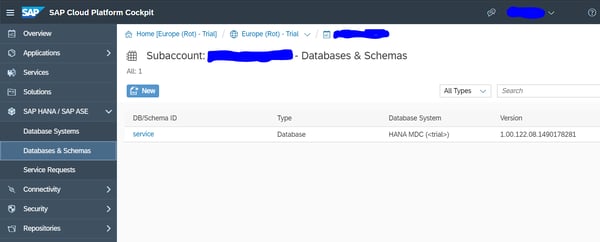
Click on Database & Schemas and click on New button.
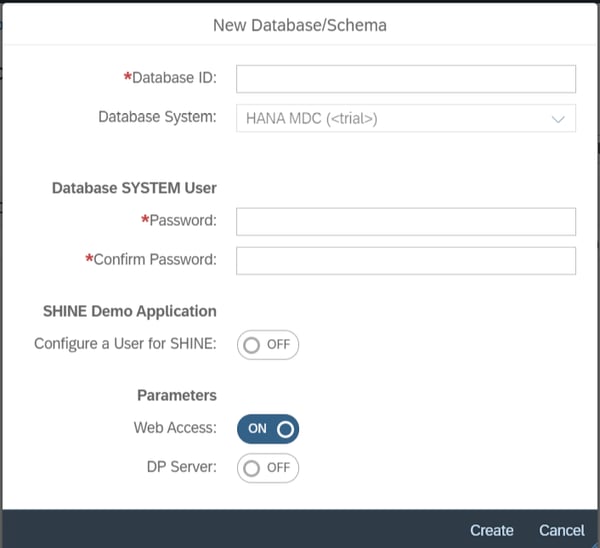
Enter DB ID as some name, password that will be used as Basic Authentication password for our OData services.
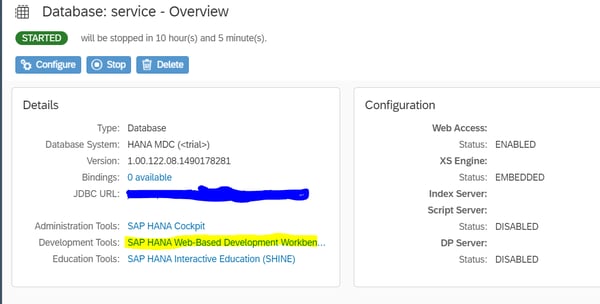
Next click on the service that you created, and then click on start. It may take some time to start the service. Once it starts, you would see a screen like this, and you have to click on 'SAP HANA Web-Based Development Workbench'.
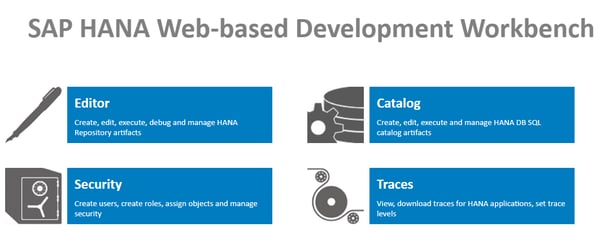
Here we will have 4 options out of which we will use:
Editor: to write our code and run it
Catalog: to check the DB, make edits and add data to the table
Click on Editor and you will see an explorer.
Right click on content and select create application. In the pop up drop down select 'empty application', name the application and then click on OK.
Your application will be created and will have 3 files by default.
Double click on .xsaccess file to open it.
Change the 2 lines as below:
"prevent_xsrf": false,
"cors": [{
	"enabled": true
}],
Right click on the created application and select new → file
Name it candidate.hdbtable
Paste the below code for creating the table:
table.schemaName = "DUMMY_SCHEMA";
table.tableType = COLUMNSTORE;
table.columns = [
    { name = "ID"; sqlType = INTEGER; nullable = false; },
    { name = "Name"; sqlType = VARCHAR; nullable = false; length = 200; },
    { name = "Gender"; sqlType = VARCHAR; nullable = false; length = 10; },
    { name = "DOB"; sqlType = VARCHAR; nullable = false; length = 20; },
    { name = "Contact"; sqlType = VARCHAR; nullable = false; length = 50; },
    { name = "Email"; sqlType = VARCHAR; nullable = false; length = 200; },
    { name = "ProfileImage"; sqlType = VARCHAR; nullable = false; length = 1000; },
    { name = "StatusID"; sqlType = VARCHAR; nullable = false; length = 5;}
];
table.primaryKey.pkcolumns = ["ID"];
Save it. In the console you will see a message that the table is created with the fields mentioned above.
Now right click on the application and select new → file and name it service.xsodata.
Paste the below code that tells what the service exposes. Here dummy_pkg is my application name and you can replace it with your application name:
service{
	"dummy_pkg::candidate";
}
Save it and you will see a message that the console service is saved and activated successfully.
Now select index.html and press the run button on the top toolbar. In a new tab you will see the path to index.html. Instead of index.html, use service.xsodata that we had created. You will see that our OData service is ready and you will see the metadata using $metadata after the service URL.
https://XXXXXXXXXXXXXX.hanatrial.ondemand.com/dummy_pkg/index.html
https://XXXXXXXXXXXXXX.hanatrial.ondemand.com/dummy_pkg/service.xsodata/
https://XXXXXXXXXXXXXX.hanatrial.ondemand.com/dummy_pkg/service.xsodata/$metadata
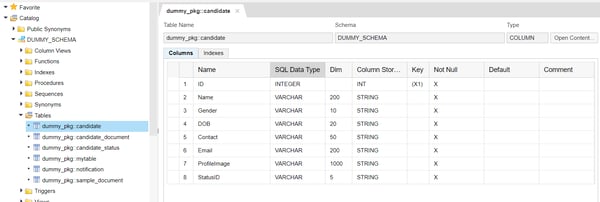
Now you can come out of the Editor, get into Catalog and locate your table. If you click on open content button on the right then you can add, edit and look into the data in the table. This data will be served using the OData service and you can test it by adding the data here, and using the below link you can access the same data.
https://XXXXXXXXXXXXXX.hanatrial.ondemand.com/dummy_pkg/service.xsodata/candidate
You can try adding more tables by creating more .hdbtable files and refer them in service as below:
service
{
    "dummy_pkg::candidate";
    "dummy_pkg::sample_document";
    "dummy_pkg::candidate_document";
    "dummy_pkg::notification";
    "dummy_pkg::candidate_status";
}
In our third and final blog we’ll be learning, how to create OData Service in SAP UI5 and the benefits of using SAP UI5/Open UI5.