Pod is a dependency manager, which supports more than 3900 libraries, both in Swift and Objective-C. Many of developers building apps via MacOS or any of the Apple platforms are aware of CocoaPods. Pods help developers reduce the fuss of adding dynamic code manually, linking them to the current project, adding them as dependencies and various other tedious processes that each framework or a third-party library demands. However, if you stumble upon an idea that you might want to make into a library and have it available for the world via CocoaPods, this post will help you in getting the desired results.
What are CocoaPods?
In simple terms, pods are libraries, which can be used in your project. It will simplify the library process of adding it to your project. If there is any new update for the library, updating a simple pod command will help in getting new updates. So, in effect, it handles:
- Installation/downloading of external code/libraries
- Linking those libraries to the current project
- Updating those library codes whenever they get upgraded
Create Your Own Pod
Creating your own pod helps in publishing the set of classes or the framework that you built and is available for others to use.
So, in order to create your own pod, follow the below mentioned five simple steps:
- Create repository in GitHub
- Clone repo to MAC
- Add your project code
- Create a pod-spec file
- Register your POD
- Install pod in your project
Create Repository in GitHub
To create a repository, all you need is a registered GitHub account.
- Login to your account
- Click on repositories and tap NEW to create a repository
- Enter repository name
- Choose public so that this repo will be available for all, If you want to make it private, you need to purchase account and publish your Podspec
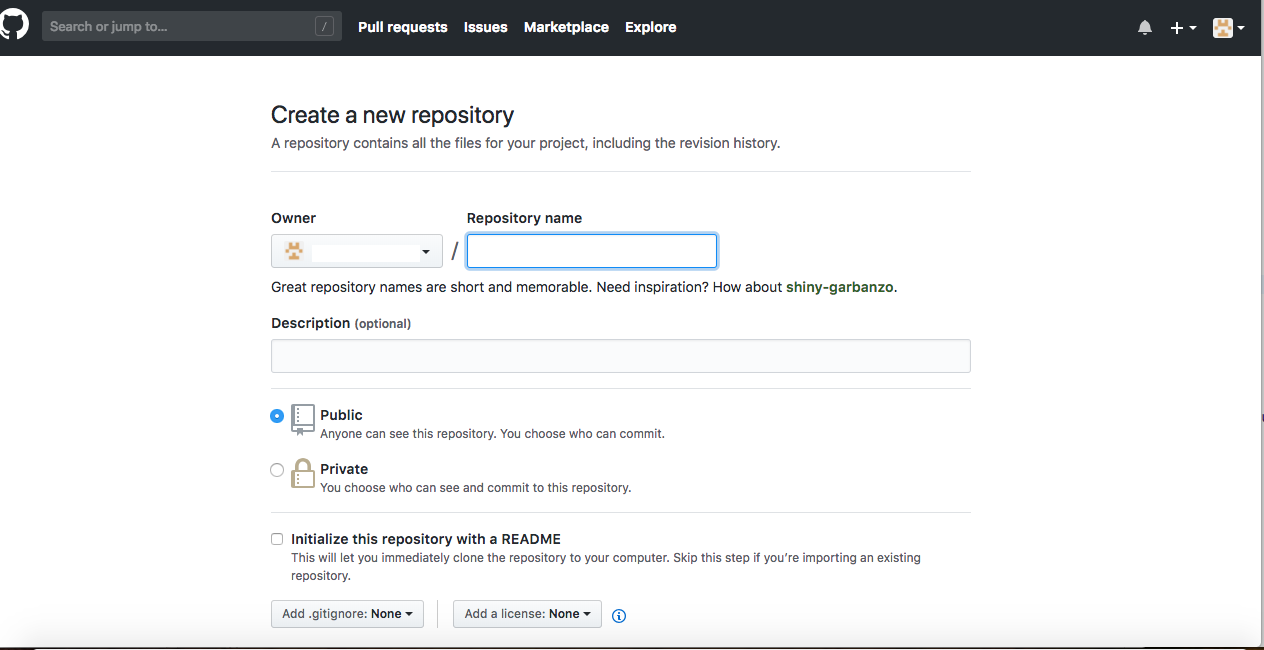
- Upon creation, below page will appear where you can find the URL to clone the repository
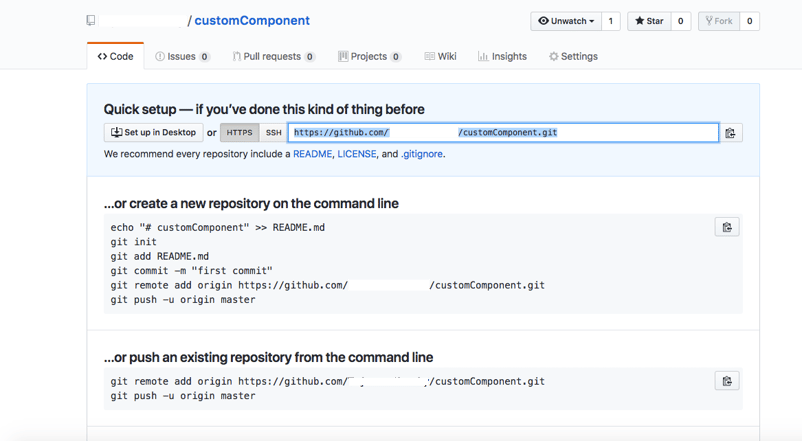
Clone Repo to MAC
Clone created repo project into your Mac from terminal or source tree using clone URL
`git clone “URL”` and add your files into the project folder. Then, commit those files.
Now, come out of your project path and enter user folder
Our first step is to add repository to CocoaPods installation
pod repo add [REPO_NAME] [SOURCE_URL]REPO_NAME: Refers to name of your Podspec
SOURCE_URL: It is the GitHub URL of repository you have created
This will create a repository in your CocoaPods folder
- Now, move to your project path
- Create a Podspec file in your current project folder path (and) use (the) below command to create
touch podname.podspecAlso, create swift version files, which is required for linting
echo "3.0" >> .swift-version [Here 3.0 is the version of swift that you are using]
Add Your Project Code
Add your project files in this folder and then create Podspec
Create a Podspec File
A podspec file will be generated in your project folder so, open your podspec file from your project folder and add the below text to that file
sample path :- >.cocoapods>repos>yourptojectname
Pod::Spec.new do |s|
s.name             = 'customPod'
s.version          = '0.0.1'
s.summary          = 'Custom pod creation for iOS'
s.description      = <<-DESC “Describe the use of pod file”
This highletbale view changes highlet text and makes your app look fantastic!
DESC

s.homepage         = 'https://github.com/username/customPod' // your repository url//
s.license          = { :type => 'MIT', :file => 'LICENSE' }
s.author           = { 'username' => 'dummyuser@abc.com' } //your git mailid
s.source           = { :git => 'https://github.com/username/customPod.git', :tag => s.version.to_s } //your git repository url//
s.ios.deployment_target = '10.0'
s.source_files = 'customPod/*'  //point the source file to which files you want to commit//
end-
Pod linting has to be done which will helps in validation of your pod-spec
Note : Remove comments with (//) and then use below command in terminal
pod lib lint // This will validate all specs in repoThe validation process shows whether build has succeeded or if there are any errors/warnings. We ignore warnings.
- Commit your code to git, now your repo will consist of complete code
- Now create a release version which should also match the pod file
git tag '0.0.1' // version number
git push --tags
Spec validation has to be done in order to register your pod file. Before linting check “git status” and commit if there are any files to commit. Later, use the below mentioned command
pod spec lintRegister Your POD
Register your pod with your email and name for confirmation
pod trunk register Your git Email your git nameThen push your pod
pod trunk push podname.podspec //custom pod should be replaced by your podspecnameYour done and know you can use your own library in your project with few simple steps given below
Install Pod On Your Project
Open workspace and add your Podspec name in pod file and run pod update in terminal
pod custompod //name of your pod file which you specified in .spec pod init
pod installIf it is unable to find Podspec path, try placing git URL in pod file as
pod 'custompod', :git=> 'https://github.com/username/customPod.git'
and then use
pod updateNow, you are all set to use your own library in your project.
Conclusion
Whether it’s a commonly used library or your own private repository, CocoaPods makes it very easy to distribute your common code across the projects. It not only reduces development time, but also standardizes certain features, which eventually leads to better productivity and less bugs.
About Innominds
Innominds is a leading Digital Transformation and Product Engineering company headquartered in San Jose, CA. With over two decades of experience in Enterprise Mobile Application Development , Innominds can help its clients optimize budget and get the best deal for the investment. Innominds offers comprehensive packaged Mobile Development Solutions for your organization’s digital workforce transformation.
Innominds’ expertise in all stages of development from design to release to an app store helps its clients build an engaging enterprise grade mobile application. Innominds Mobility Center of Excellence (CoE) includes a strong team with deep experience across multiple technologies like Native, Hybrid, Cross-Platform & Cross-Platform Native Frameworks, along with reusable components and processes in place to strategize, design and develop your mobile application.
Interested! For any demos or project discussions, please write to us at marketing@innominds.com and know more about our offerings.