Want to build quick enterprise-grade multi-channel applications with features like translation and internationalisation support, and responsive on all devices, and convert into native applications?
SAP UI5, Open UI5 is one of the rapid application development (RAD) frameworks that can help you build the right app.
In our first blog you had learnt how to setup SAP UI5 development environment, project folder structure and the basics of SAP UI5.
In our second blog we covered the basics of SAP HANA and the steps for creating backend OData service.
In this third and final blog, you will learn:
- How to perform routing in an application
- How to create an entry using UI (Create)
- How to consume oData in SAP UI5 application (Read)
- How to update an entry (Update)
- How to delete an entry (Delete)
We assume you have webIDE set up and a project ready to start working on (trial account is good enough).
We have discussed how to test the service in our earlier blog.
https://XXXXXXXXXXXXXX.hanatrial.ondemand.com/dummy_pkg/service.xsodata/
You will see some data in the browser. If not, make sure you login into SAP HANA cockpit and start the service. Usually, in a trial account, the service will be stopped after few hours.
Click on File → New → Project from template and select SAPUI5 application. Click Next.
Give a name to the project and namespace and click next
View type XML and click finish
A new project will be created
Expand the project folder
Expand webapp folder
Expand views and double click on view1.view.xml (default view created)
Remove the code after <App> and keep empty <App> component
We shall load the content into App using the router
So, your view1 will look like:

Create a new view using right-click on the views and add new file name to it Home.view.xml
Create a new controller using right-click on the controller and add a new file name to it
Home.controller.js
sap.ui.define([
	"sap/ui/core/mvc/Controller"
], function (Controller) {
	"use strict";

	return Controller.extend("tut.tut.controller.Home", {
		candidate: function(){
			var oRouter = sap.ui.core.UIComponent.getRouterFor(this);
			oRouter.navTo("Candidate");
		}
	});
});
In the side menu, select the storyboard option

Click on the edit view button (making sure your project, and the view is selected)
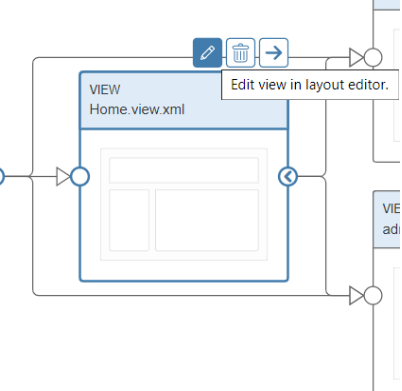
This is an easy way to drag and drop the controls and change the properties of controls instead of writing them that can speed up the development.
From the left side control pane, drag a button and drop it on the view. Change the text to candidate.
Do the same again and change the text to admin.
In the right pane, scroll down properties to width and enter 100% and the button width will change. Do this for both the buttons.
Now, we have two buttons on our page and see how easy it is to add and configure.
Now, let’s switch back to Home.view.xml in the Development section from the left side menu from where we came to the storyboard.
You will see two buttons code will be added to our view.xml
This is our landing component or home component, which will be loaded into the App component.
Let’s create another view for a candidate.
Right-click on the views and add new file. Name it Candidate.view.xml
Content of xml should be:
<mvc:View controllerName="tut.tut.controller.Candidate" xmlns="sap.m" xmlns:mvc="sap.ui.core.mvc">
	<Page title="candidate">
		<headerContent>
			<Button xmlns="sap.m" text="Go Back" id="button0" width="100%"press=".goBack"/>
		</headerContent>
		<content>
			<Text text="Welcome Candidate"/>
		</content>
	</Page>
</mvc:View>
Right-click on controllers and add new file. Name it candidate.controller.js. Code as below:
sap.ui.define([
	"sap/ui/core/mvc/Controller",
	"sap/ui/core/routing/History"
], function (Controller,History) {
	"use strict";

	return Controller.extend("tut.tut.controller.admin", {
		goBack: function () {
			var oHistory = History.getInstance();
			var sPreviousHash = oHistory.getPreviousHash();
			if (sPreviousHash !== undefined) {
				window.history.go(-1);
			} else {
				var oRouter = sap.ui.core.UIComponent.getRouterFor(this);
				oRouter.navTo("Home", true);
			}
		}
	});
});
Here we look for history or we go to the home page as a default route.
Open manifest.json and select the descriptor editor in the bottom tab.
Routing has 3 parts:
1. config
This section contains the global router configuration.
2. routes
Each route defines a name, a pattern, and one or more targets to navigate to when the route has been hit. The pattern is basically the URL part that matches the route. The order of routes is important as the first route will be the default route and if the URL pattern is empty, it will be the first to get loaded. In the pattern, you can give candidate/candidateID and from the controller while navigating send an object with this property, which can be accessed in target using:
onInit: function () {
			var oRouter = sap.ui.core.UIComponent.getRouterFor(this);
			oRouter.getRoute("detail").attachPatternMatched(this._onObjectMatched, this);
		},
		_onObjectMatched: function (oEvent) {
			this.getView().bindElement({
				path: "/" + oEvent.getParameter("arguments").invoicePath,
				model: "invoice"
			});
		}
3. targets
A target defines a view that is displayed. It is associated with one or more routes and can be displayed manually within the app. Whenever a target is displayed, the corresponding view is loaded and shown in the app.
Select Routing tab
Here we will configure routing.
Scroll down to Manage Targets.
Click on + and add two targets, Home and Candidate.
On the right side of the section, you will see properties.
For View Name select Home and Candidate that we have created above.
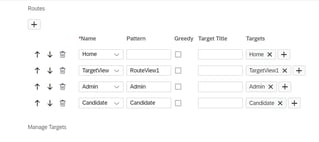
Above 'Manage Target' we have 'Routes'
Click on the + symbol and select Candidate from the dropdown, pattern = Candidate.
Click on target + and select Candidate target.
Similarly, for Home
Click on the + symbol and select Candidate from dropdown, pattern = “” (should be blank for default) Click on target + and select Candidate target.
Now using the up arrow move Home Routes to topmost so that it becomes our default route to load first.
Your routes will look like this:
Hit CTRL+S to save changes to manifest.json
Click on the run button and select index.html
Till now we have learnt to create a route, navigate to a new page and back. We have also learnt to use the press event of button.
Now let’s quickly look at CRUD operations and mapping oData.
Go to manifest Descriptor Editor
Select Data Sources tab
Click on +
Select Service URL
Click on create a new data source
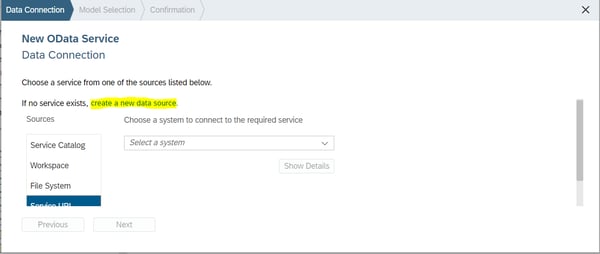
Give your trial account username and password (not SAP HANA Database Basic authentication)
Give name to source
In URL give: https://XXXXXXXXXXXXXX.hanatrial.ondemand.com/dummy_pkg/service.xsodata
Authentication select Basic Authentication
Give SAP HANA username (mostly SYSTEM) and password you have used
Click on create
You will be back to the above screen, give relative URL:/and hit test
All the services (table from hdbtable) will be listed. Select one of it that we shall use (like candidate) and click next
Select new model and give a name; this name we will refer in controller
Click next
Click finish
To get the model in controller we use:
var oModel = this.getOwnerComponent().getModel("candidate_document");
candidate is name of model given in the above process
CREATE example for candidate_document table:
var oEntry = {};
			oEntry.CandidateID = 1;
			oEntry.DocumentID = 1;
			oEntry.DocumentStatus = "Under Review";
			var oModel = this.getOwnerComponent().getModel("candidate_document");
			oModel.read("/candidate_document",{
				sorters:  [new sap.ui.model.Sorter("ID",true)],
			 	success: function(odata){
			 		console.log("MAX ID===",odata.results[0].ID);
			 		oEntry.ID = odata.results[0].ID + 1;
					oModel.create('/candidate_document', oEntry, null, function(){
						console.log("data saved...!");
					});
			 	}
			});
READ example from candidate:
var oModel = this.getOwnerComponent().getModel("candidate");
			 oModel.read("/candidate",{
			 	success: function(odata){
			 		console.log(odata.results);
			 		odata.results.forEach(ele=>{
			 			statusCount[ele.StatusID].totalCount = statusCount[ele.StatusID].totalCount+1;
			 		});
			 		console.log(statusCount);
			 		var statusOModel = new JSONModel({data: statusCount});
			 		view.setModel(statusOModel,"status");
			 	}
			 })

view.setModel(statusOModel,"status");
sets the model to view that can be used in view with a name like status>/data/1/totalCount
UPDATE example to update status:
var oEntry = {};
    		 oEntry.DocumentStatus = "Approved";
			var oModel = this.getOwnerComponent().getModel("candidate_document");
			console.log(oModel);

			oModel.update("/candidate_document(1)",oEntry,null,function(){alert("updated");});
DELETE
oModel.remove("/candidate('"+ID+"')", {
    method: "DELETE",
    success: function(data) {
     alert("success");
    },
    error: function(e) {
     alert("error");
    }
   });
Rapid development of enterprise grade multi-channel application
Want to build quick enterprise multi-channel applications with features like Translation and internationalisation support, responsive on all devices, covert into native applications?
SAP UI5, Open UI5 is one of the RAD frameworks that can help you achieve it!
Benefits of using SAP UI5/Open UI5:
-
Enterprise ready
Provides easy to implement internalization, theming, and is also accessibility compliant that can help the developer follow best practices and uniform coding standards. Enterprise applications usually grow and hence may become difficult to maintain over a period of time. SAP UI5 / Open UI5 helps developers follow a structure and achieve enterprise-grade applications in a short time and deliver quality code.
-
Single code base helps better maintainability and quick updates on all platforms (mobile & web) making it a one-stop shop
Using this framework, we can have a single code base to generate web and mobile applications that can be deployed to the app store. Any future updates, bug fixes or enhancements can be handled in a single code base and deployed on multiple channels. It’s a one-stop-shop that can help in building components, routing, MVC and data binding to create your applications completely in UI5 without additional libraries.
-
Lightweight
SAP UI5 provides different namespaces for different purposes like sap.m is the main control that is used for touch devices and desktop browsers. SAP.ui helps in providing UI related JS functionality like feature detection.
-
Easy to integrate with OData and Rest Backend services
The framework provides an easy way to integrate with OData or REST services. Just by doing some config changes to manifest we can enable connectivity to OData service. Such a connection model can be used in the controller to perform CRUD operations. The framework also provides ways to bind the data with UI controls, so it responds to data without any extra coding.
-
SAP Web IDE for ease of development, build, deployment and integration with SAP cloud platforms
SAP Web IDE offers a wide range of template that helps as a foundation to a project. It also defines the structure, which can be followed as the project grows. SAP Web IDE enables one-click deployment and a live link, which helps in easily showcasing demo to clients. SAP Web IDE also enables to Drag and Drop controls, routes (page navigation) and configure it to our needs without coding.
-
Cost-effective development due to large number (around 300) of built-in components
Much of the time spent in UI development is in finding the right library that fits the requirement for fast-track development. This framework provides more than 300 UI controls, which are enterprise-ready and Fiori compliant. SAP Fiori is a design language defining user interaction that takes care of most of the enterprise features.
-
UI Modernization responsive web component development
SAP UI5/ Open UI5 uses latest web standards of HTML5, CSS3
With this we have come to end of SAP-UI5 series of 3 blogs in which you have learnt:
- Basics of SAP UI5
- Creating HANA based backend API
- Integrating API with SAP UI5 application
If you are thinking of creating enterprise-class responsive applications, opt for SAP UI5 framework. It has many pre-built components and functions which are proven and blend nicely with SAP platform, making integration with HANA or other SAP services easy.