The Android team came up with a new navigation system for developers which helps in simplifying complex navigation situations like drawer or button navigation making it fast, easy and efficient. The Navigation component seems to provide an all-in-one developer solution to all the complex problems and for any type of navigation in the android app. While the JetPack Navigation component is a suite of libraries, tooling, and guidance that provides a robust navigation framework for in-app navigation. But before, let us take a dive into the context.

The Conventional Fragment management
In Android, fragment plays a key role. A fragment represents a behaviour or a part of the User Interface (UI) in the activity. We can combine multiple fragments in a single activity to build multi-pane UI and reuse a fragment in multiple activities. A fragment is a section in 'activity' which has its lifecycle. Fragment receives its events and is added and removed while the activity is running (sort of like a "sub activity" that can be re-used in different activities). For calling one fragment to another, the fragment manager plays a crucial role.
The following code shows how to call a fragment:
    1 FragmentManager manager = getSupportFragmentManager();
    2 FragmentTransaction transaction = manager.beginTransaction();
    3 transaction.replace(R.id.output, fragment);
    4 transaction.commit();
Regular problems with a conventional fragment management
There are few drawbacks in using fragment manager, and they are as follows:
- Back Navigation
- commit () and commitAllowingStateLoss()
- Fragment and Bundle
- When to use FragmentTransaction add vs replace?
- Fragment receivers, broadcasts, and memory leaks
Solution
All of the above-mentioned problems can be surpassed with the latest ‘Navigation Component in Android JetPack.’ To implement this solution, there are certain steps that need to be followed.
Prerequisite
The Navigation component comes with an Android JetPack. The Android JetPack libraries ship separately from the Android OS. It comes with Android-x namespace shipped separately from the Android platform and provides backward compatibility across Android releases.
Navigation Component:
The Navigation component is a library that manages complex fragment navigations, deep-linking, animations, and compile-time checked arguments passing between the fragments in the app.
The Navigation component consists of three main components:
- Navigation Graph: The Navigation graph is an XML resource file that contains all navigation-related information in one location. It has all individual content areas within your app named destinations and also the possible paths or steps that a user can take through the app.
- Nav Host: The Nav Host is an empty container that displays all destinations from your navigation graph. The navigation component has a default navhost implementation which displays the fragment destinations.
- NavController: The NavController is an object that manages app navigation within a Nav Host. It also orchestrates the swapping of destination content in the Nav Host as users move throughout your app.
Get started with the Navigation component
Set up your environment
Add the following dependencies to your app's build.gradle file to include navigation support.
dependencies {
 def nav_version = "2.1.0"
 // Java
 implementation "androidx.navigation:navigation-fragment:nav_version"
 implementation "androidx.navigation:navigation-ui:navversion"
 implementation"androidx.navigation:navigation−ui:nav_version"
 // Kotlin
 implementation "androidx.navigation:navigation-fragment-ktx:nav_version"
 implementation "androidx.navigation:navigation-ui-ktx:navversion"
 implementation"androidx.navigation:navigation−ui−ktx:nav_version"
}
Create a Navigation Graph
Navigation from one screen to another is straightforward, we can connect to any screen where users can navigate. These destinations/screens are connected via actions. We can also pass the parameters.
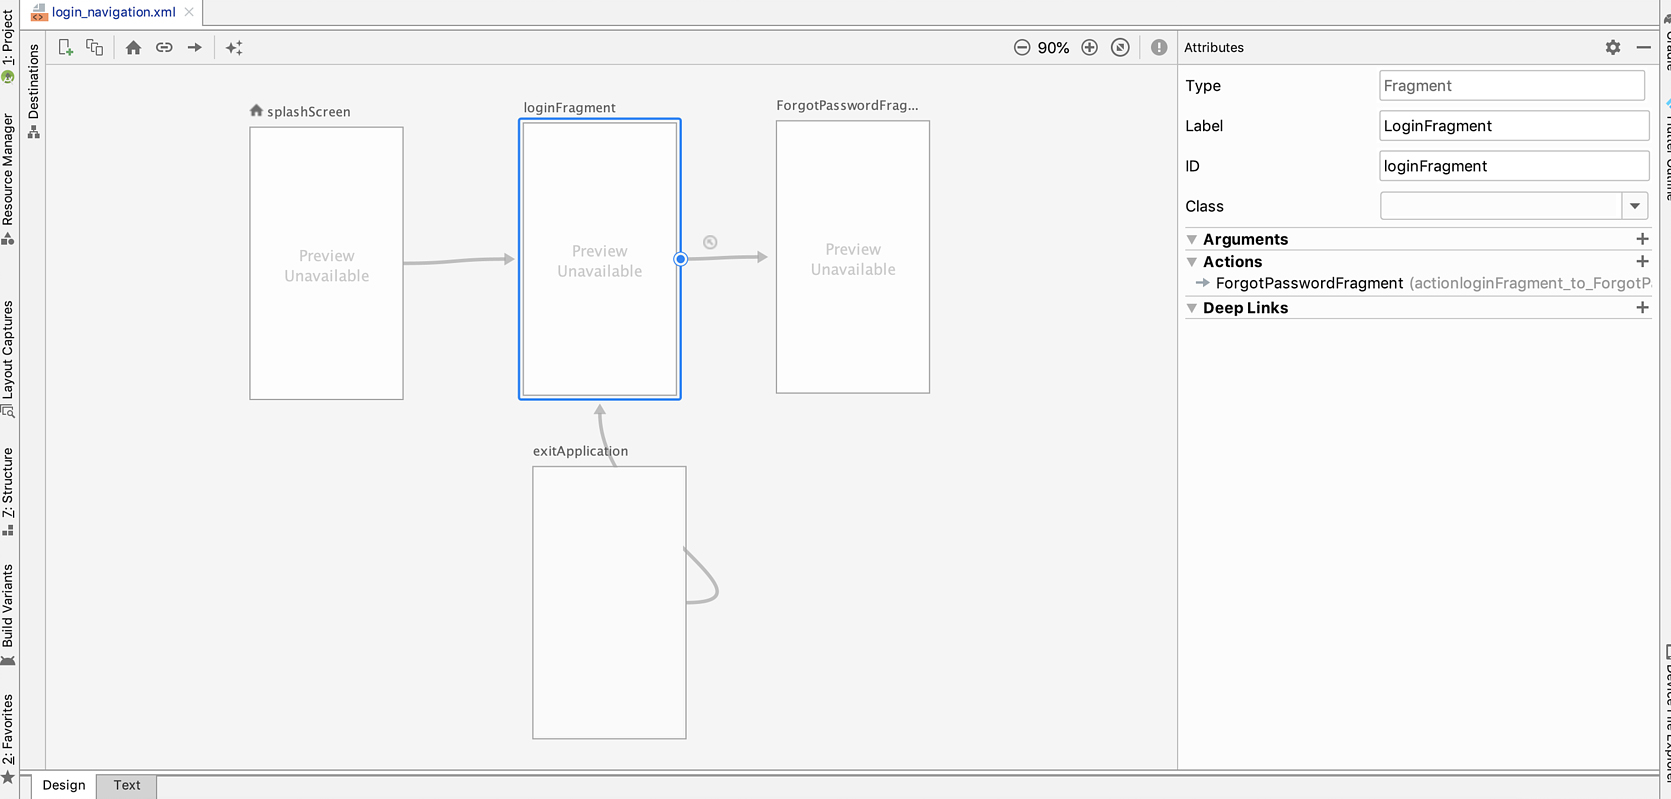
The following image shows how the Navigation graph looks like for a sample app containing four destinations connected by three actions. Here, each screen is represented by a preview thumbnail and the connecting actions are represented by arrows which pretty much indicate how users can navigate from one screen to another.
The following are the steps to add a Navigation graph to your project:
- Open your project window and right-click on the res directory and select the New > Android Resource File. The New Resource File dialog appears.
- Enter the File name field, such as "nav_graph" or any name, which suits you based on your requirement.
- Next, we need to select the Navigation from the Resource type drop-down list, and then click OK.
After the first Navigation graph is added, the Android Studio creates a navigation resource directory within the res directory. Here it contains your navigation graph resource file (nav_graph.xml, for example).
Navigation Editor
In the android studio, we can directly open the navigation editor, where we can visually edit the navigation graphs or edit the underlying XML.
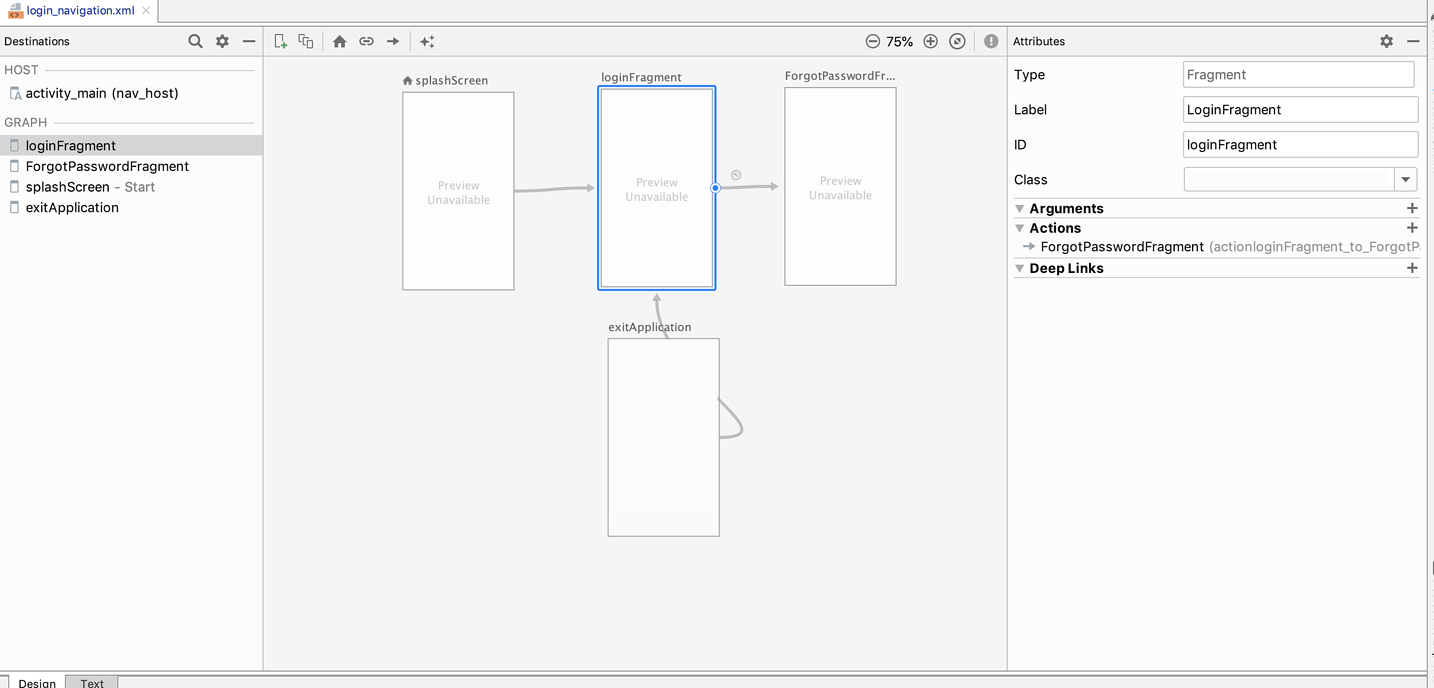
The Navigation editor is divided into three parts:
- Destinations Panel: It will show the list of your navigation host and all the screens currently in the Graph editor.
- Graph Editor: It shows a visual representation of your navigation graph. It enables you to switch between the Design view and the underlying XML representation which is in the Text view.
- Attributes: We can see the attributes for the currently-selected item in the navigation graph.
By clicking on the Text tab to see the corresponding XML, following snippet shows up:
 <?xml version="1.0" encoding="utf-8"?>
<navigation
 xmlns:android="http://schemas.android.com/apk/res/android"
 xmlns:app="http://schemas.android.com/apk/res-auto"
   android:id="@+id/nav_graph">

</navigation >
The <navigation> element is the root element of a navigation graph. While you add the destinations and the connecting actions to your graph, you can witness the corresponding <destination> and <action> elements as the child elements. If you have the nested graphs, they will appear as child <navigation> elements.
Add a NavHost to an Activity
The Navigation host is one of the main important parts of the navigation component. It's an empty container where screens are swapped in and out as a user navigates through the app. Navigation hosts must derive from NavHost. The navigation component's default NavHost implementation and NavHostFragment handles swapping fragment destinations.
Adding an NavHostFragment via XML
The following examples show NavHostFragment as part of the main activity.
<?xml version="1.0" encoding="utf-8"?>
<androidx.constraintlayout.widget.ConstraintLayout
 xmlns:android="http://schemas.android.com/apk/res/android"
 xmlns:app="http://schemas.android.com/apk/res-auto"
 xmlns:tools="http://schemas.android.com/tools"
 android:layout_width="match_parent"
 android:layout_height="match_parent"
 tools:context=".MainActivity">

<androidx.appcompat.widget.Toolbar
.../>

<fragment
android:id="@+id/nav_host_fragment"
         android:name="androidx.navigation.fragment.NavHostFragment"
         android:layout_width="0dp"
         android:layout_height="0dp"
         app:layout_constraintLeft_toLeftOf="parent"
         app:layout_constraintRight_toRightOf="parent"
         app:layout_constraintTop_toTopOf="parent"
         app:layout_constraintBottom_toBottomOf="parent"
         app:defaultNavHost="true"
         app:navGraph="@navigation/nav_graph" />
Note:
- The first attribute Android: We need to pass the name of NavHost implementation
- We need to pass the app:navGraph, which is associated with the NavHostFragment with a navigation graph
- Next, an important attribute app:defaultNavHost=" true" to handle the system back button
Basic Principles of Navigation
The core part of user experience is navigation between screens and apps. The following are the basic principles we need to implement while using the navigation component.
Fixed Start Destination
In the navigation component, we need to set a fixed start destination. The Start destination is the first screen, a user will get to see, as and when they launch an app from the launcher. Coincidentally, this particular start destination will also be the last screen the user sees when they return back to the launcher after pressing the back button.
<?xml version="1.0" encoding="utf-8"?>
<navigation xmlns:android="http://schemas.android.com/apk/res/android"
            xmlns:app="http://schemas.android.com/apk/res-auto" xmlns:tools="http://schemas.android.com/tools"
            android:id="@+id/devices_navigation" app:startDestination="@id/UsersListFragment">
</navigation>
In the above mention code, UsersListFragment starts destination. That's the first screen where users see when the app first launches also that's the last screen when the user wants to exit the app.
Up and Back Buttons are Identical
The back button appears at the bottom of the screen and is used to navigate in reverse order through the history of screens the user recently worked with. When users press the back button, the current screen is popped off the top of the back stack, and navigate to a previous destination. The Up button appears at the top of the screen, both up and bottom buttons behave identically.
The Up Button Never Exits Your App
The up button on the app bar does not appear when users are at the app's start destination that’s because the up button never will exit the app. However, the back button shown at the bottom does exit the app.
Along with all these features in the Navigation component, it supports deep linking and recreates a realistic back stack when linking to any destination in your navigation graph.
Passing Data Between Destinations
Another interesting thing with the navigation component was passing data between various destinations. For example, a user profile screen might take a user ID argument to determine which user to display. The following code presents how to pass arguments.
<fragment android:id="@+id/userFragment" >
     <argument
         android:name="UserID"
         app:argType="integer"
         android:defaultValue="1234" />
 </fragment>
| Type |
Usage/syntax |
Default value? |
Null values? |
|
Integer |
app:argType="integer" |
Yes |
No |
|
Float |
app:argType="float" |
Yes |
No |
|
Long |
app:argType="Long" |
Yes |
No |
|
Boolean |
app:argType="Boolean" |
Yes |
No |
|
String |
app:argType="String" |
Yes |
Yes |
|
Resource Reference |
app:argType="reference" |
Yes ("@resourceType/resourceName" (e.g. "@style/myCustomStyle") or "0") |
No |
|
Custom Parcelable |
app:argType="<type>", where <type> is the fully-qualified class name of the Parcelable |
Supports a default value of "@null". It does not support other default values. |
Yes |
|
Custom Serializable |
app:argType="<type>", where <type> is the fully-qualified classname of the Serializable |
Supports a default value of "@null". It does not support other default values. |
Yes |
|
Custom Enum |
app:argType="<type>", where <type> is the fully-qualified name of the enum |
Yes - Default values must match the unqualified name (e.g. "MONDAY" to match MyWeekday.MONDAY). |
No |
Navigation component supports different arguments types:
We can pass different types of data from one fragment to another. We can pass only the minimal amount of data between destinations. If you are looking to pass on large amounts of data, you should consider using a ViewModel as described in the Share data between fragments.
Other Benefits of Using Navigation Component:
- Handling Fragment transactions
- Handling Up and Back actions correctly by default
- Provides standardized resources for animations and also transitions
- Implementing and handling deep linking
- It supports navigation UI patterns, navigation drawers, and bottom navigation
- Complete ViewModel support - We can effectuate and scale up a ViewModel to a navigation graph to share UI-related data between the graph's destinations
Migration to Navigation Component
We can also migrate an existing app to use the Navigation component. First, we need to migrate to AndroidX libraries.
These are the following steps that we need to follow:
- Move screen-specific UI logic out of activities: We need to move the app's UI logic out of activities, each activity owns only the logic of global navigation UI components, like toolbar, while delegating the implementation of each screen to a fragment or any custom destination.
- Integrate the Navigation component: For each activity, we need to create a navigation graph that contains one or more fragments managed by that activity. Replace fragment transaction logic with navigation component operations.
- Add activity destinations: Replace startActivity() calls with actions using activity destinations.
- Combine activities: We can combine navigation graphs in a case where multiple activities share a common layout. Combine navigation graphs in cases where multiple activities share a common layout.
Conclusion
Introducing Navigation components in a project will immensely help in the transition and in the passing of data between the fragments. This automatically manages some of the crucial elements that are otherwise, become hard to work on with the conventional fragment management system. With the help of NavHost, innumerable fragments and transitions can be handled within the application. It takes out the frustration of handling a substantial amount of custom code for the developers in an 'activity' while handling fragments. It reduces the complexity of building fragment transition management methods and takes less time to build an application.