Every year at I/O, Google reveals extensive quality features to make developer’s life easy and assist them in building quality applications. Last year, at I/O 18, Google introduced new Android Studio Tool features to review design changes at compile time. In this article, we will go through some of those design-time features.
xmlns:tools="http://schemas.android.com/tools"Android Studio supports a variety of XML attributes in the tools namespace that enable design-time features. We use tools:text (use it if not already, instead of hard-coding text with android:text for design checks) with plain text or with a label from strings.xml file. But, we can do a lot more. Tools attributes can be helpful in designing. When you build your app, the build tools remove these attributes. As a result, there is no effect on your APK size or runtime behavior.
Real-Time Example:
Fragment
-
tools:layoutThis attribute is used only by <fragment> tags and informs editor about the layout that should be drawn by layout preview inside the fragment. </fragment>
<fragment android:layout_width="match_parent"
	* android:layout_height="match_parent"
	* android:id="@+id/fragment"
	* tools:layout="@layout/fragment_layout"/>
|
Without attributes |
With attributes |
|---|---|
|
<fragment>
|
Item 0 |
This looks better. Now, we know that our fragment will display the layout containing RecyclerView.
RecyclerView
-
tools:listitemThis attribute allows us to replace the lines of "Item 0, Item 1 ..." in the preview into a "Real Item" we have built for the application. -
tools:listheader | tools:listfooterYou can use these attributes to set header and footer layouts of a ListView. -
tools:itemCountYou can adjust the size of the list item.
<android.support.v7.widget.RecyclerView
android:layout_width="match_parent"
android:layout_height="0dp"
app:layout_constraintTop_toTopOf="parent"
app:layout_constraintStart_toStartOf="parent"
app:layout_constraintEnd_toEndOf="parent"
tools:listitem="@layout/sample_card_view_item"
tools:itemCount="3"
app:layout_constraintBottom_toBottomOf="parent"/>
|
Without attributes |
With attributes |
|---|---|
|
Item 0 |
   |
In the above diagram, we can see how our RecyclerView will appear. We can restrict the size of the list using itemCount. Let's see the code of sample_card_view_item.xml (only some part of the code is shown here to emphasize the tools attributes).
<ImageView
	...
	...
	tools:srcCompat="@mipmap/ic_launcher"
	android:id="@+id/imageView"/>
<TextView
	...
	...
	tools:text="Name"
	android:id="@+id/nameTextView" />
<TextView
	...
	...
	tools:text="Phone"
	android:id="@+id/phoneTextView" />
We used tools:text to set the text in our TextViews and tools:SrcCompat to set app icon as image for ImageView preview.
"@tools:sample/" resources
These are the most useful resources to inject placeholder data or images into our views. Currently, Android Studio offers the following types of predefined data that can be injected into our view elements.
|
Attribute value |
Description of placeholder data |
|---|---|
|
@tools:sample/full_names |
Full names that are randomly generated from the combination of @tools:sample/first_names and @tools:sample/last_names |
|
@tools:sample/first_names |
Common first names |
|
@tools:sample/last_names |
Common last names |
|
@tools:sample/cities |
Names of cities from across the world |
|
@tools:sample/us_zipcodes |
Randomly generated US zip codes |
|
@tools:sample/us_phones |
Randomly generated phone numbers with the following format: (800) 555-xxxx |
|
@tools:sample/lorem |
Placeholder text that is derived from Latin |
|
@tools:sample/date/day_of_week |
Randomized dates and times for the specified format |
|
@tools:sample/date/ddmmyy |
|
|
@tools:sample/date/mmddyy |
|
|
@tools:sample/date/hhmm |
|
|
@tools:sample/date/hhmmss |
|
|
@tools:sample/avatars |
Vector drawables that you can use as profile avatars |
|
@tools:sample/backgrounds/scenic |
Images that you can use as backgrounds |
We can update our code to use the above sample data.
<ImageView
	...
	...
	tools:srcCompat="@tools:sample/avatars"
	android:id="@+id/imageView"/>
	<TextView
	...
	...
	tools:text="@tools:sample/full_names"
	android:id="@+id/nameTextView" />
	<TextView
	...
	...
	tools:text="@tools:sample/us_phones"
	android:id="@+id/phoneTextView" />
Here, we used sample data given by tools library to populate our fields accordingly.
|
Without changes |
With changes |
|---|---|
   |
 |
It will populate each cell of the ListView or RecyclerView with different random data, including pictures. And you don't have to worry about the size of the APK for these sample data because these are only for design-time preview and will be discarded while building the APK as mentioned at the beginning of this article.
My Own Sample Data
What if the sample data provided by the library doesn't meet our criteria or we want to have our own set of data for various reasons? Yes, we can do it. Just right-click on the “app” folder and later “new > Sample Data directory”.
It will create a “sampledata” folder where you can put your data inside simple files (If it is not created, you can create a directory with the same name).
Under your folder, add plain text file where you put raw data, line by line. For the sake of simplicity, I created a file indian_names.txt and added below names.
Ramesh Hari
Suresh
Girish
Mahesh
Updated the code to use the names I provided instead of sample data from tools library.
<TextView
...
tools:text="@sample/indian_names.txt"
android:id="@+id/nameTextView" />
|
Without changes |
With changes |
|---|---|
 |
 |
If you want to create a more complex sample data, you can use JSON object.
Things to Remember
- It must be a JSON object at the root
- It must compile your project to see your new/updated data
Create a JSON file subjects.json with the below content.
{
	"data": [
				{
					"phone": 9999955555,
					"name": "Ramesh"
				},
				{
					"phone": 9999966666,
					"name": "Hari"
				},
				{
					"phone": 9999977777,
					"name": "Suresh"
				},
				{
					"phone": 9999988888,
					"name": "Girish"
				}
			]
}
Then, you can access this data.
<ImageView
...
...
tools:srcCompat="@tools:sample/avatars"
android:id="@+id/imageView"/>
<TextView
...
...
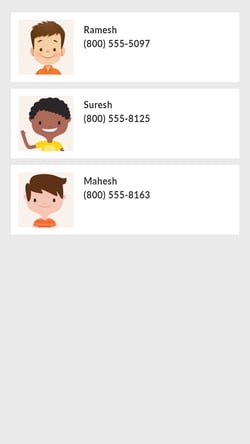
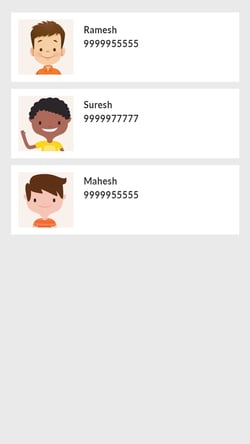
tools:text="@sample/subjects.json/data/name"
android:id="@+id/nameTextView" />
<TextView
...
...
tools:text="@sample/subjects.json/data/phone"
android:id="@+id/phoneTextView" />
|
Without changes |
With changes |
|---|---|
 |
 |
Conclusion
As you can see, tools: helps us in many ways to prototype and experiment with our layout without a single line of Java or Kotlin code. It also won't have any impact on any real device. So, we don't have to worry about deleting it. If you start using it, you can save a lot of time by reviewing your design at compile time than by actually building and debugging your screen on an emulator or real device.
About Innominds
Innominds is a leading Digital Transformation and Product Engineering company headquartered in San Jose, CA. It offers co-creation services to enterprises for building solutions utilizing digital technologies focused on Devices, Apps, and Analytics. Innominds builds better outcomes securely for its clients through reliable advanced technologies like IoT, Blockchain, Big Data, Artificial Intelligence, DevOps and Enterprise Mobility among others. From idea to commercialization, we strive to build convergent solutions that help our clients grow their business and realize their market vision.
Interested! For any demos or project discussions, please write to us at marketing@innominds.com and know more about our offerings.


